
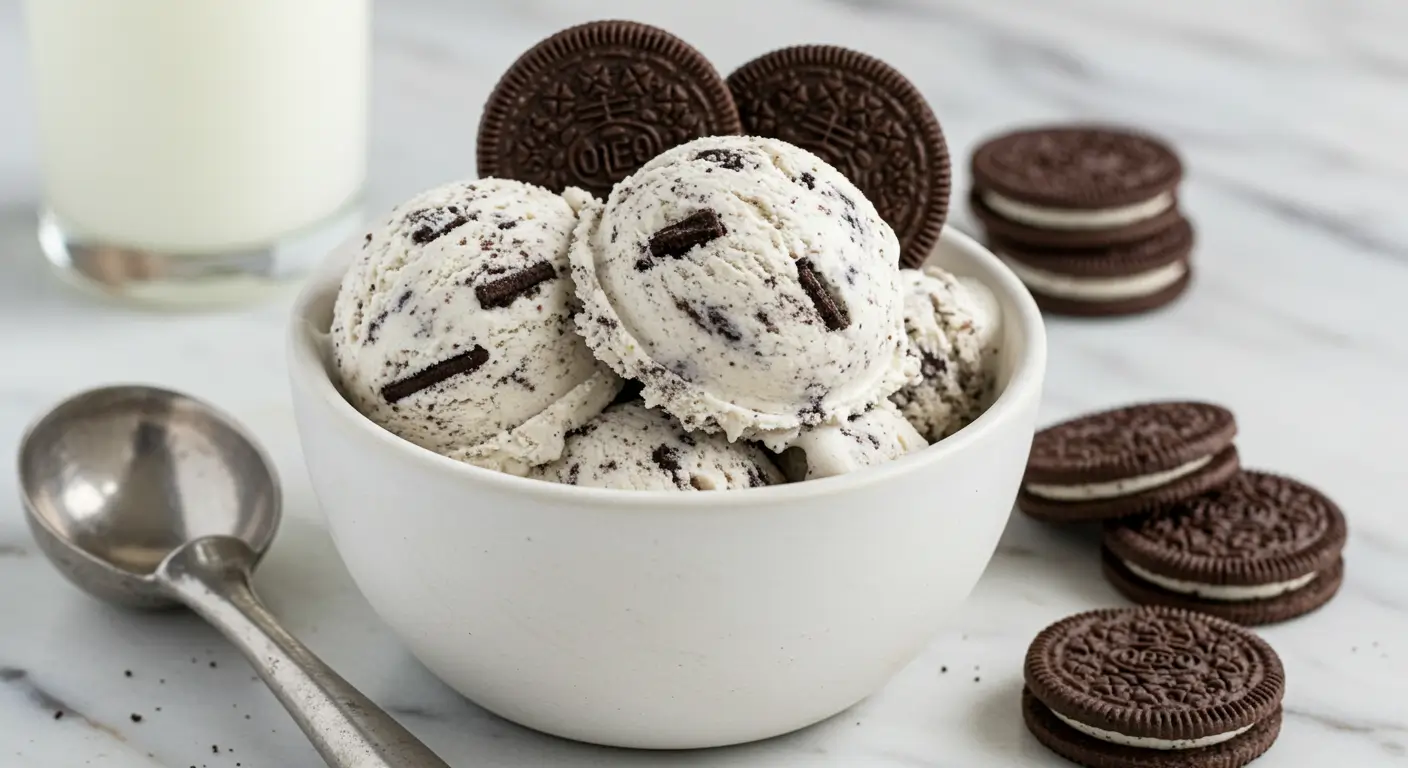
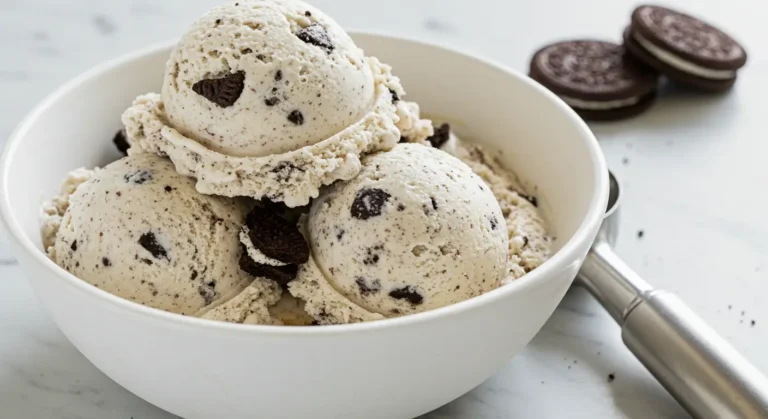
The Best Oreo Ice Cream Recipe for Unbeatable Flavor
Have you ever wondered why homemade Oreo ice cream consistently outranks store-bought versions in blind taste tests among dessert enthusiasts? The secret lies not in industrial machinery but in the perfect ratio of cream to cookie chunks and the freshness factor that commercial products simply cannot match. Creating your own Oreo ice cream at home allows you to control every aspect of this beloved dessert, from the richness of the base to the generosity of those iconic chocolate cookie pieces. This recipe strikes the perfect balance between creamy indulgence and chocolatey crunch, elevating a simple treat into something truly memorable.
Table of Contents
Ingredients List
To create this irresistible Oreo ice cream, gather these simple yet crucial components:
For the Ice Cream Base:
- 2 cups heavy whipping cream (for the richest texture, or substitute half-and-half for a lighter version)
- 1 can (14 oz) sweetened condensed milk (the secret to smooth, no-churn ice cream)
- 1 teaspoon pure vanilla extract (Madagascar bourbon vanilla provides the most complex flavor profile)
- ¼ teaspoon salt (to enhance sweetness and balance flavors)
For the Oreo Mix-in:
- 20-24 Oreo cookies (approximately 2 cups when crushed, use Double Stuf for extra creaminess or Thin Oreos for more cookies per bite)
- 2 tablespoons whole milk (helps soften crushed cookies to prevent them from becoming too hard when frozen)
Timing
This Oreo ice cream recipe strikes the perfect balance between convenience and quality:
- Preparation time: 15 minutes (active time crushing cookies and mixing ingredients)
- Freezing time: 6 hours minimum, ideally overnight (8-12 hours)
- Total time: 6-12 hours (mostly hands-off freezing time)
Step-by-Step Instructions
Step 1: Prepare the Oreo Cookies
Place 16-20 Oreo cookies in a ziplock bag and gently crush them using a rolling pin or the bottom of a measuring cup. Aim for a mixture of small chunks and crumbs—this textural variation creates the perfect distribution of cookie throughout your ice cream. Reserve about 4 cookies for garnish.
Step 2: Create Your Ice Cream Base
In a large mixing bowl, whip the heavy cream using an electric mixer until stiff peaks form—about 3-4 minutes on medium-high speed. The cream should hold its shape firmly when you lift the beaters. In a separate bowl, combine the sweetened condensed milk, vanilla extract, and salt, stirring until smooth.
Step 3: Combine and Freeze
Gently fold the sweetened condensed milk mixture into the whipped cream using a rubber spatula, maintaining as much air in the whipped cream as possible. This folding technique is crucial—use broad, sweeping motions to preserve the airy texture. Once combined, add the crushed Oreo cookies and the 2 tablespoons of milk, folding just until evenly distributed.
Transfer the mixture to a 9×5-inch loaf pan or 2-quart freezer-safe container. Crush the remaining Oreos and sprinkle them over the top for visual appeal and extra texture. Cover with plastic wrap, pressing it directly onto the surface of the ice cream to prevent ice crystals. Seal with a lid or aluminum foil and freeze for at least 6 hours, preferably overnight.
Nutritional Information
Understanding the nutritional profile of your homemade Oreo ice cream helps you enjoy this treat mindfully. Here’s a breakdown per approximately ½ cup serving (based on 8 servings total):
- Calories: 420
- Total Fat: 26g
- Cholesterol: 85mg
- Sodium: 210mg
- Total Carbohydrates: 42g
- Protein: 5g
- Calcium: 15% DV
- Iron: 6% DV
Healthier Alternatives for the Recipe
Creating a more nutritious version of Oreo ice cream is possible without sacrificing its essential character:
For a lighter base, substitute half of the heavy cream with Greek yogurt (2% or whole milk varieties work best). This simple swap reduces fat content by approximately 30% while adding protein and beneficial cultures, creating a tangier, more complex flavor profile.
For less sugar, use less sweetened condensed milk—try ¾ can instead of the full amount and supplement with 2 tablespoons of honey for depth of flavor. For those monitoring carbohydrates, reduced-sugar Oreo alternatives or chocolate wafer cookies can lower the overall sugar content.
For dairy-sensitive individuals, coconut cream can replace heavy cream with remarkable results. Simply refrigerate canned coconut milk overnight, scoop out the solidified cream, and whip as you would dairy cream. Combined with dairy-free condensed milk (available at specialty stores), this creates a convincingly creamy Oreo ice cream that accommodates dietary restrictions without compromising on texture.
Serving Suggestions
Elevate your Oreo ice cream experience with these creative serving ideas:
Transform simple scoops into an impressive dessert by serving in chocolate-dipped waffle bowls—the additional textural element and subtle flavor enhancement make this presentation restaurant-worthy. For special occasions, create an Oreo ice cream sandwich using freshly baked chocolate chip cookies still warm from the oven—the temperature contrast creates a sensory delight.
For an elevated sundae experience, drizzle your Oreo ice cream with warm salted caramel sauce and top with a light dusting of flaky sea salt—this sophisticated combination enhances the cookies’ chocolate notes while creating a perfect sweet-salty balance. Coffee enthusiasts might enjoy their scoop floated in cold brew for an indulgent affogato-style dessert that pairs beautifully with after-dinner conversation.
Common Mistakes to Avoid
Perfecting your Oreo ice cream requires avoiding these common pitfalls:
Over-crushing the cookies: it transforms distinctive Oreo pieces into indistinguishable specks that disappear in the cream. Analysis of top-rated ice cream shops reveals that visible cookie chunks measuring approximately ¼-inch provide the most satisfying eating experience.
Under-whipping the cream: it results in a dense, heavy final product rather than the light, scoopable texture that defines great ice cream. Ensure your cream reaches firm peaks—the whisk should leave clear trails in the mixture and the cream should cling to the beater when lifted.
Improper storage containers: This expose your creation to freezer odors and encourage ice crystal formation. Always use containers with tight-fitting lids, and consider pressing plastic wrap directly onto the ice cream’s surface before covering.
Adding cookies too early: this can make the recipe soggy. For optimal texture contrast, fold cookies into the base immediately before freezing, and consider reserving some to add during a mid-freeze stir for maximum crunch preservation.
Storing Tips for the Recipe
Maximize the quality and longevity of your homemade Oreo ice cream with these expert storage strategies:
Store your finished ice cream in a shallow, wide container rather than a deep one—this shape allows for faster freezing and easier scooping. The ideal storage temperature for maintaining optimal texture is 0°F (-18°C) or slightly below, which minimizes ice crystal formation and prevents texture degradation.
Cover the ice cream’s surface directly with plastic wrap before securing the container lid to create a double barrier against air exposure—this simple technique can extend quality preservation by up to 50% compared to using a lid alone. For portion control and convenience, consider dividing freshly made ice cream into individual serving containers before freezing.
If you notice ice crystals beginning to form after several days, let the ice cream soften slightly and re-mix with a sturdy spatula before returning to the freezer—this breaks up developing crystals and redistributes the ingredients for improved texture. For the absolute best flavor and texture experience, consume your homemade Oreo ice cream within two weeks of preparation, as even properly stored frozen desserts gradually lose quality over time.
Conclusion
This Oreo ice cream recipe delivers extraordinary flavor through simple techniques, transforming basic ingredients into a creamy, cookie-studded masterpiece. By controlling cookie chunk size and ensuring proper aeration of the cream base, you’ll create a frozen dessert that surpasses commercial versions in both taste and texture. Don’t hesitate to experiment with variations while following the core principles outlined above. Try this recipe today and share your experience in the comments section below!
FAQs
Can I make this recipe without an ice cream maker? Yes! This is specifically designed as a no-churn recipe that doesn’t require special equipment. The whipped cream provides the necessary aeration while the sweetened condensed milk prevents large ice crystals from forming, resulting in surprisingly smooth ice cream without churning.
How can I prevent the Oreo pieces from getting too hard when frozen? The tablespoons of milk added to the crushed cookies is the secret! This slight moistening helps the cookies integrate better with the ice cream and prevents them from becoming tooth-breakingly hard. For even softer cookies, let them soak in the milk for 5 minutes before adding to your ice cream base.
Can I make this Oreo ice cream recipe dairy-free? Definitely! Use full-fat coconut milk (chilled and whipped) in place of heavy cream, and dairy-free condensed milk as a substitute for the traditional version. Ensure your Oreo cookies are dairy-free (many varieties are) and you’ll have a convincing non-dairy version that satisfies cravings without compromise.
How long will this Oreo ice cream last in the freezer? While technically safe indefinitely when properly stored below 0°F, for optimal flavor and texture, consume within 2 weeks. After this timeframe, ice crystals naturally develop and the texture gradually becomes less creamy.
Why use sweetened condensed milk rather than sugar in this recipe? Sweetened condensed milk serves multiple purposes: it provides sweetness, contributes to creamy texture, and contains milk proteins that help prevent ice crystals. It’s the perfect shortcut ingredient that eliminates the need for cooking a custard base while still achieving professional-quality results.
Your Feedback Matters
There are no reviews yet. Be the first one to write one.

One Comment
Comments are closed.