
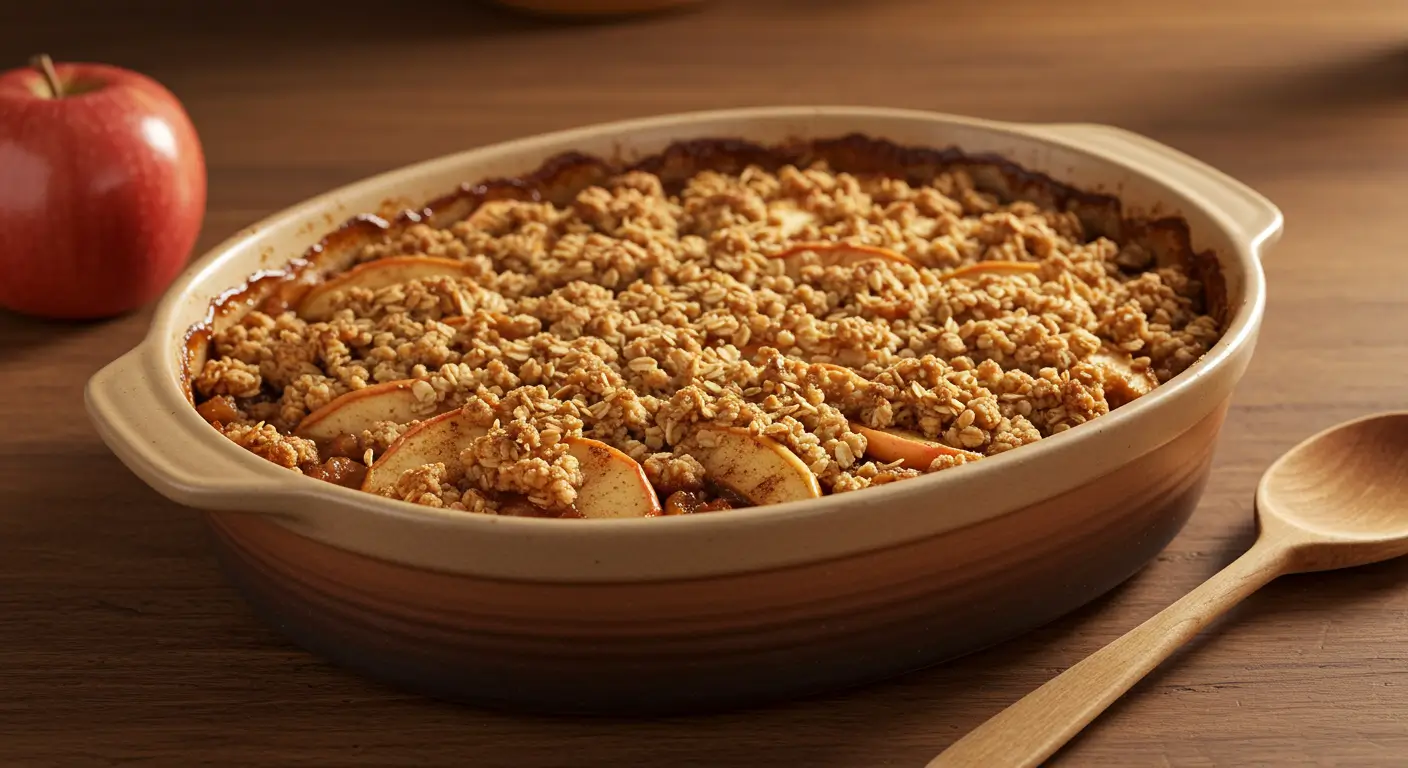
Easy Apple Crisp in 30 Minutes or Less
Have you ever wondered why some apple crisp recipes take over an hour when this beloved comfort dessert can actually be prepared and baked in just 30 minutes? Most home bakers assume that creating the perfect apple crisp requires lengthy preparation and extended baking time, but the truth is that with the right technique and ingredient preparation, you can have a golden, bubbling apple crisp on your table faster than you might think. This quick apple crisp method doesn’t compromise on flavor or texture – instead, it maximizes efficiency while delivering that irresistible combination of tender, cinnamon-spiced apples topped with a perfectly crispy, buttery oat crumble that makes this baked dessert recipe a household favorite.
Table of Contents
Ingredients List
For this apple crisp you’ll need a carefully selected combination of fresh and pantry staples that work together to create layers of flavor and texture. The beauty of this recipe lies in its simplicity and the flexibility to customize based on your preferences or dietary needs.
For the Apple Filling:
- 6 medium apples, peeled and thinly sliced
- 2 tablespoons granulated sugar
- 1 tablespoon fresh lemon juice
- 1 teaspoon ground cinnamon
- 1/4 teaspoon nutmeg
- 2 tablespoons cornstarch
For the Crispy Topping:
- 1 cup old-fashioned rolled oats
- 3/4 cup all-purpose flour
- 1/2 cup packed brown sugar
- 1/2 cup cold unsalted butter, cubed
- 1/2 teaspoon salt
- 1/4 teaspoon vanilla extract
Substitution Options: Feel free to swap apples for pears, use coconut sugar instead of brown sugar, or replace butter with vegan alternatives for dietary restrictions. Gluten-free flour works perfectly as a one-to-one replacement for all-purpose flour.
Timing
This apple crisp requires minimal time investment with maximum flavor payoff:
- Prep Time: 15 minutes (including apple slicing and topping preparation)
- Baking Time: 25 minutes at 375°F
- Total Time: 40 minutes from start to finish
- Cooling Time: 5 minutes before serving (optional but recommended for best texture)
Step-by-Step Instructions
Step 1: Prepare Your Oven and Baking Dish
Preheat your oven to 375°F and generously butter a 9×13 inch baking dish or individual ramekins if you prefer single servings. The higher temperature is key to achieving that perfect crispy top while ensuring the apples cook through quickly.
Step 2: Prepare the Apple Mixture
Wash, peel, and slice your apples into thin, uniform pieces – about 1/4 inch thick works perfectly. Toss the sliced apples with lemon juice immediately to prevent browning, then combine with sugar, cinnamon, nutmeg, and cornstarch. The cornstarch is crucial for thickening the natural apple juices during baking, preventing a soggy bottom crust.
Step 3: Create the Crispy Topping
In a separate bowl, combine oats, flour, brown sugar, and salt. Cut in the cold butter using a pastry cutter, two forks, or your clean hands until the mixture resembles coarse crumbs with some pea-sized butter pieces remaining. These butter chunks will create pockets of richness and help achieve that coveted crispy texture. Drizzle in vanilla extract and mix gently.
Step 4: Assemble and Bake
Spread the seasoned apple mixture evenly in your prepared baking dish, then distribute the oat topping uniformly over the apples. Don’t pack it down – a light, even layer allows for better browning and crispiness. Bake for 25 minutes until the top is golden brown and the apple juices are bubbling around the edges.
Step 5: Rest and Serve
Allow the apple crisp to rest for 5 minutes after removing from the oven. This brief cooling period helps the juices thicken slightly and makes serving much easier while still maintaining that perfect warm temperature for optimal enjoyment.
Nutritional Information
For a serving of this apple crisp (assuming 8 servings per recipe):
- Calories: 285 per serving
- Total Fat: 12g
- Saturated Fat: 7g
- Cholesterol: 30mg
- Sodium: 150mg
- Total Carbohydrates: 45g
- Dietary Fiber: 4g
- Sugars: 28g
- Protein: 3g
- Vitamin C: 8mg
- Potassium: 180mg
Healthier Alternatives for the Recipe
Transform your apple crisp into a healthier version with these modifications that maintain delicious flavor while boosting nutritional benefits:
- Replace all-purpose flour with almond flour or oat flour for added protein and reduced refined carbs
- Substitute brown sugar with coconut sugar or maple syrup for lower glycemic impact
- Use Greek yogurt in place of half the butter for increased protein and reduced saturated fat
- Add chopped walnuts or pecans to the topping for healthy omega-3 fatty acids
- Incorporate chia seeds into the apple mixture for extra fiber and nutrients
- Replace regular oats with steel-cut oats for more texture and slower-releasing energy
- Use coconut oil instead of butter for a dairy-free, metabolism-boosting alternative
- Add ground flaxseed to increase omega-3 content and fiber
Serving Suggestions
Elevate your apple crisp experience with these ideas that transform a simple dessert into a memorable culinary moment:
- Serve warm topped with a scoop of vanilla bean ice cream for the classic temperature contrast
- Drizzle with homemade caramel sauce or store-bought dulce de leche for extra indulgence
- Pair with freshly whipped cream infused with a touch of bourbon or rum extract
- Dust with powdered sugar and serve alongside strong black coffee or chai tea
- Create a breakfast version by serving with Greek yogurt and a drizzle of honey
- Garnish with toasted coconut flakes and a sprinkle of sea salt for sophisticated flavor layers
- Accompany with aged cheddar cheese for a traditional New England-style presentation
- Serve in individual mason jars layered with whipped cream for elegant individual portions
Common Mistakes to Avoid
Master this apple crisp by avoiding these pitfalls that can compromise your dessert’s success:
- Over-mixing the topping: Excessive mixing melts the butter and creates a dense rather than crispy texture
- Using warm butter: Cold butter is essential for achieving the proper crumbly consistency in your topping
- Cutting apples too thick: Thick slices won’t cook through in the shortened baking time
- Skipping the lemon juice: This prevents browning and adds brightness to balance the sweetness
- Packing the topping: Gently sprinkling allows air circulation for maximum crispiness
- Opening the oven door frequently: This releases heat and extends baking time unnecessarily
- Using only one apple variety: Mixing sweet and tart apples creates more complex flavor profiles
- Forgetting to preheat: A properly heated oven ensures even cooking from the start
Storing Tips for the Recipe
Preserve the freshness of your apple crisp with these strategies that maintain quality and extend enjoyment:
- Refrigerator storage: Cover tightly with plastic wrap or aluminum foil and store for up to 4 days
- Freezing instructions: Wrap individual portions in plastic wrap and freeze for up to 3 months
- Reheating method: Warm covered portions in a 350°F oven for 10-15 minutes to restore crispiness
- Make-ahead preparation: Assemble completely but don’t bake; cover and refrigerate up to 24 hours before baking
- Room temperature storage: Safe for up to 2 hours after baking, but refrigerate thereafter for food safety
- Portion control: Slice and store individual servings for easy grab-and-go desserts throughout the week
- Topping separation: Store leftover topping separately in the refrigerator and sprinkle on fresh fruit or yogurt
Conclusion
This 30-minute apple crisp proves that exceptional homemade desserts don’t require hours of preparation. By using the right techniques – thin apple slices, cold butter, and proper oven temperature – you can create a restaurant-quality dessert that delivers perfectly tender, spiced apples beneath a golden, crispy oat topping. The recipe’s flexibility accommodates various dietary needs while maintaining incredible flavor.
Try this recipe today and share your results in the comments below. We’d love to hear about your favorite serving combinations or creative modifications!
FAQs
Can I make this apple crisp ahead of time? Yes, you can assemble the entire dish up to 24 hours in advance and refrigerate covered, then bake when ready to serve.
What’s the best apple variety for apple crisp? A combination of Honeycrisp and Granny Smith apples provides the perfect balance of sweetness and tartness with ideal texture retention.
Can I use quick oats instead of old-fashioned oats? Old-fashioned oats are recommended as they maintain better texture and don’t become mushy during baking, but quick oats can work in a pinch.
How do I know when my apple crisp is done? The topping should be golden brown and the apple juices should be bubbling around the edges of the dish.
Can this recipe be doubled? Absolutely! Use a larger baking dish (like a 9×13 inch pan) and increase baking time by 5-10 minutes, watching for the golden-brown topping.
Is it normal for the topping to sink slightly? A small amount of settling is normal as the apples release moisture during baking, but most of the topping should remain on the surface.
Can I make individual servings? Yes, divide the mixture among 6-8 ramekins and reduce baking time to 18-20 minutes for perfectly portioned desserts.
What should I do if my topping isn’t getting crispy? Increase oven temperature to 400°F for the last 5 minutes of baking, watching carefully to prevent burning.
Your Feedback Matters
There are no reviews yet. Be the first one to write one.


One Comment
Comments are closed.