
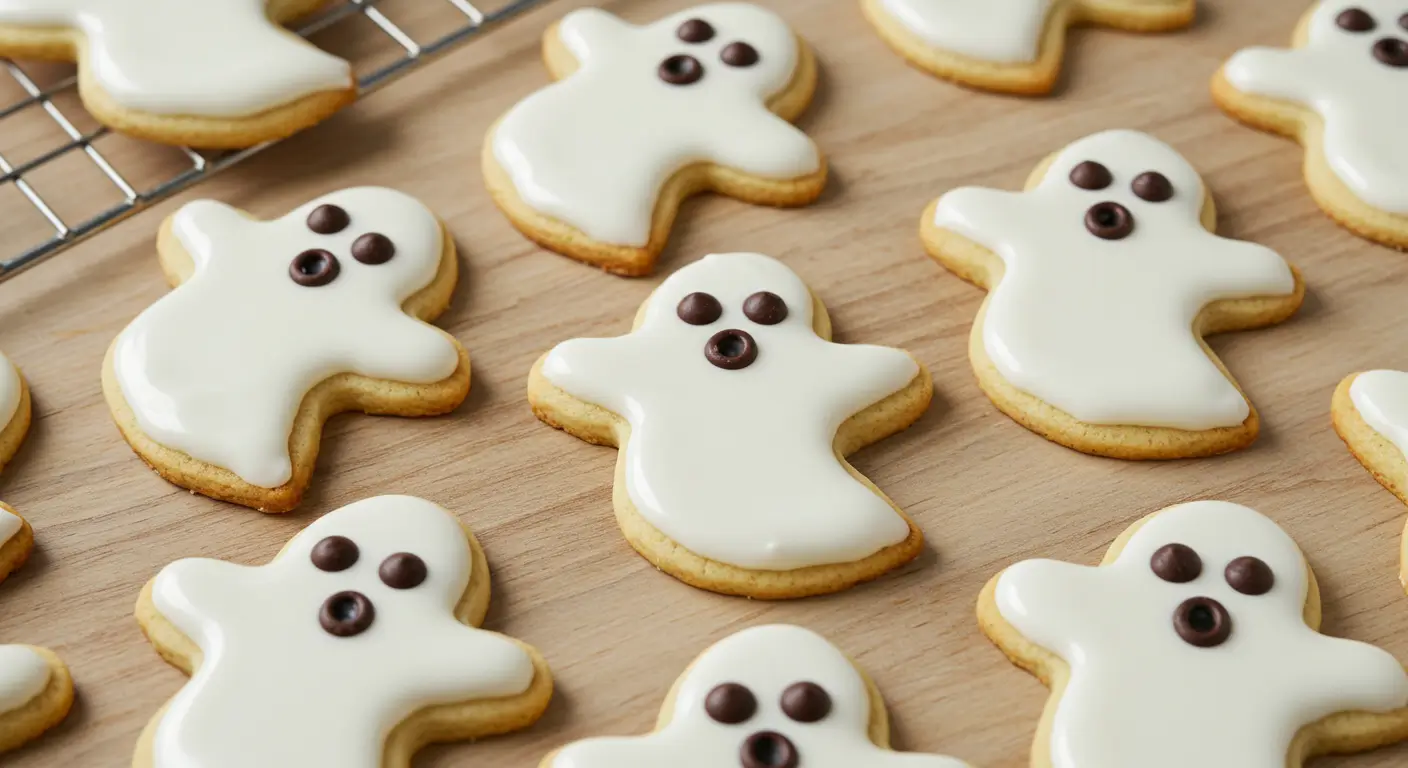
Ghost Cookies Recipe: Easy Halloween Treat
What if creating spine-tingling Halloween magic in your kitchen required nothing more than basic baking ingredients and 30 minutes of your time? This ghost cookies recipe transforms ordinary sugar cookie dough into enchanting spectral treats that captivate both children and adults alike. These otherworldly confections prove that the most memorable Halloween desserts often emerge from the simplest techniques and ingredients. The beauty of these ghostly creations lies in their versatility and foolproof nature. Unlike complicated Halloween decorating projects that demand advanced piping skills or expensive specialty tools, this baked dessert recipe relies on accessible ingredients and straightforward methods that guarantee success every single time.
Table of Contents
Ingredients List
For this ghost cookies recipe you’ll need these carefully selected ingredients that create the perfect balance of flavor and workability:
For the Cookie Base:
- 2½ cups all-purpose flour, sifted for tender texture
- 1 cup unsalted butter, softened to room temperature
- ¾ cup granulated sugar for sweetness and structure
- 1 large egg, room temperature for optimal binding
- 2 teaspoons pure vanilla extract for aromatic depth
- ½ teaspoon baking powder for gentle lift
- ¼ teaspoon salt to enhance overall flavor
For the Ghostly Decoration:
- 2 cups powdered sugar, finely sifted
- 3-4 tablespoons whole milk or heavy cream
- ½ teaspoon vanilla extract
- 24-30 mini chocolate chips for spooky eyes
- Black gel food coloring (optional for mouth details)
Timing
This ghost cookies recipe requires strategic time management for optimal results:
- Prep time: 20 minutes for dough preparation and mixing
- Chilling time: 30 minutes for easier cookie cutting
- Baking time: 10-12 minutes per batch
- Cooling time: 15 minutes before decorating
- Decorating time: 20-25 minutes for icing and details
- Total active time: 45 minutes of hands-on work
- Total time: 1 hour 45 minutes including chilling
Step-by-Step Instructions
Step 1: Create the Perfect Cookie Dough
Cream the softened butter and granulated sugar in a large mixing bowl using an electric mixer on medium speed for 3-4 minutes until light and fluffy. Add the egg and vanilla extract, beating until fully incorporated. The mixture should appear smooth and cohesive without any streaks.
Step 2: Combine Dry Ingredients
In a separate bowl, whisk together the sifted flour, baking powder, and salt. Gradually add these dry ingredients to the butter mixture, mixing on low speed until just combined. Avoid overmixing to prevent tough cookies.
Step 3: Chill and Shape
Wrap the dough tightly in plastic wrap and refrigerate for 30 minutes. This chilling step prevents spreading and makes the dough easier to handle. On a lightly floured surface, roll the dough to ¼-inch thickness and cut into ghost shapes using cookie cutters or a knife.
Step 4: Bake to Perfection
Preheat your oven to 350°F and line baking sheets with parchment paper. Place ghost-shaped cookies 2 inches apart and bake for 10-12 minutes until edges are lightly golden. The centers should remain pale for authentic ghostly appearance.
Step 5: Prepare the Royal Icing
While cookies cool completely, whisk together powdered sugar, milk, and vanilla extract until smooth. The consistency should coat the back of a spoon but still be fluid enough for easy spreading.
Step 6: Transform into Spooky Spirits
Using a small offset spatula or knife, spread white icing evenly over each cooled cookie, leaving slightly irregular edges for authentic ghost-like flowing appearance. Immediately press two mini chocolate chips into the wet icing for eyes.
Step 7: Add Final Spooky Details
For mouth details, use a toothpick dipped in black gel coloring to create small oval shapes below the eyes. Allow icing to set completely for 2-3 hours before handling or storing.
Nutritional Information
For a serving of this ghost cookies recipe, you’ll receive the following nutritional profile per cookie:
- Calories: 145-160 per medium ghost cookie
- Total fat: 6-8 g
- Saturated fat: 4-5 g
- Carbohydrates: 22-25 g
- Sugar: 12-15 g
- Protein: 2-3 g
- Fiber: 0.5-1 g
- Sodium: 45-55 mg
- Calcium: 15-20 mg
- Iron: 0.8-1.2 mg
Healthier Alternatives for the Ghost Cookies Recipe
Transform your ghost cookies recipe into a healthier version with these modifications:
- Whole grain flour: Replace half the all-purpose flour with whole wheat pastry flour for added fiber
- Natural sweeteners: Substitute coconut sugar or maple sugar for refined granulated sugar
- Greek yogurt addition: Replace 2 tablespoons of butter with plain Greek yogurt for protein boost
- Almond flour blend: Use 25% almond flour for healthy fats and reduced carbohydrates
- Sugar-free icing: Create icing using powdered erythritol instead of traditional powdered sugar
- Coconut oil substitute: Replace butter with solid coconut oil for plant-based alternative
- Egg replacement: Use flax eggs or applesauce for vegan-friendly versions
- Reduced sugar: Cut sugar content by one-third and add extra vanilla for sweetness perception
- Protein powder boost: Add 2 tablespoons vanilla protein powder to increase protein content
Serving Suggestions
Elevate your ghost cookies recipe experience with these ideas:
- Create a haunted cookie platter alongside pumpkin-shaped treats and spider cookies
- Package individual cookies in clear cellophane bags tied with orange ribbon for party favors
- Serve with warm spiced apple cider or hot chocolate for cozy autumn evenings
- Arrange cookies on a dark wooden board with dry ice for dramatic presentation effects
- Pair the ghost cookies recipe with vanilla ice cream for a delightful Halloween dessert combination
- Display cookies in a glass apothecary jar labeled “Captured Spirits” for themed parties
- Create cookie sandwiches using vanilla buttercream between two ghost cookies
- Serve alongside other Halloween treats like candy corn fudge or pumpkin cupcakes
- Present your ghost cookies recipe on black plates with orange napkins for striking color contrast
- Use as edible decorations for Halloween cakes or cupcake toppers
Common Mistakes to Avoid
Master this ghost cookies recipe by avoiding these pitfalls:
- Overmixing the dough: Stop mixing as soon as flour incorporates to prevent tough, chewy cookies
- Skipping the chilling step: Cold dough holds its shape better and prevents excessive spreading during baking
- Rolling dough too thin: Maintain ¼-inch thickness for cookies that won’t break during decorating
- Decorating warm cookies: Always allow cookies to cool completely before applying icing to prevent melting
- Making icing too thick: Proper consistency should flow smoothly but not be so thin it runs off edges
- Using expired baking powder: Check freshness dates to ensure proper cookie rise and texture
- Overbaking: Remove cookies when edges are barely golden to maintain soft, tender centers
- Crowding baking sheets: Provide adequate space between cookies for even heat circulation
- Rushing the setting process: Allow icing to dry completely before stacking or packaging cookies
- Inconsistent cookie sizes: Use consistent pressure when cutting for uniform baking results
Storing Tips for the Ghost Cookies Recipe
Preserve the freshness of your ghost cookies recipe with these strategies:
- Airtight containers: Store decorated cookies in single layers separated by parchment paper for up to one week
- Room temperature storage: Keep cookies at consistent room temperature away from heat sources and humidity
- Freezer preparation: Freeze undecorated baked cookies for up to three months in freezer-safe containers
- Icing protection: Ensure royal icing has completely hardened before stacking to prevent smudging
- Humidity control: Place silica gel packets in storage containers to absorb excess moisture
- Cookie tin method: Use vintage cookie tins lined with wax paper for traditional storage approach
- Individual wrapping: Wrap each decorated cookie in plastic wrap for longer-term storage or gifting
- Dough storage: Raw cookie dough keeps refrigerated for up to five days or frozen for three months
- Temperature stability: Avoid storing cookies in areas with temperature fluctuations like near ovens
- Separation technique: Never store soft cookies with crispy varieties to maintain texture integrity
Conclusion
This ghost cookies recipe combines simplicity with spectacular results, creating memorable Halloween treats that delight all ages. The foolproof technique ensures consistent success while allowing creative personalization through decorating variations and flavor modifications.
Ready to conjure up some kitchen magic? Try this ghost cookies recipe today and share your spooky creations in the review section below. Leave a comment on our blog with photos of your ghostly masterpieces – fellow bakers love seeing creative variations and decorating inspiration from the community.
FAQs
What’s the best way to achieve smooth royal icing? Sift your powdered sugar thoroughly and add liquid gradually while whisking constantly. The ideal consistency should coat the back of a spoon but still flow smoothly when spread.
How do I prevent my cookies from spreading too much during baking? Ensure your dough is properly chilled for at least 30 minutes before baking, and avoid placing cookies on warm baking sheets. Room temperature dough spreads more than cold dough.
How long do decorated cookies stay fresh? Properly stored ghost cookies with royal icing remain fresh for up to one week at room temperature in airtight containers, maintaining both flavor and texture.
Can I make this ghost cookies recipe gluten-free? Yes! Substitute the all-purpose flour with your preferred gluten-free flour blend in a 1:1 ratio. The texture may be slightly different but still delicious.
Why did my royal icing crack after drying? Cracking usually occurs when icing is applied too thickly or dries too quickly. Apply thinner layers and allow gradual drying at room temperature rather than using heat.
What’s the secret to perfect chocolate chip eyes placement? Press mini chocolate chips gently into wet royal icing immediately after spreading. The icing will hold them in place as it dries and hardens.
Can children help make these cookies safely? Absolutely! Kids can help with mixing ingredients, cutting shapes, and placing chocolate chip eyes. Adult supervision is needed for oven use and hot cookie handling.
Your Feedback Matters
There are no reviews yet. Be the first one to write one.

One Comment
Comments are closed.