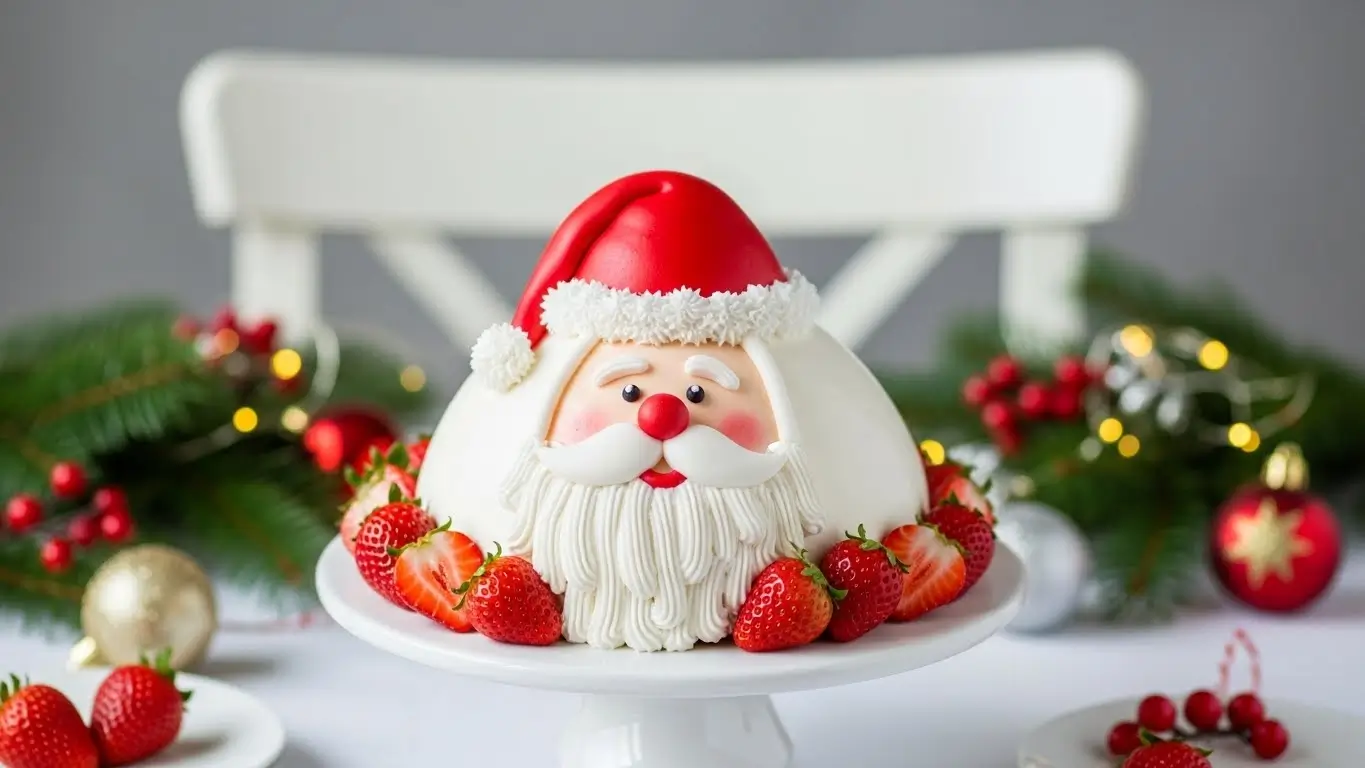
Santa Claus Dome Recipe: Beautiful Holiday Dessert Idea
What if the most show-stopping dessert at your Christmas table required no baking but delivered professional-level elegance that rivals any pastry shop creation? The santa claus dome recipe achieves exactly that—a stunning no bake dessert combining layers of cake, mousse, and whipped cream molded into a perfect dome shape. This festive creation originated from French entremet techniques simplified for home kitchens, featuring red and white layers that evoke Santa’s iconic colors. The santa claus dome recipe transforms simple ingredients into an architectural marvel that serves as both dessert and centerpiece.
Table of Contents
Ingredients List
For this santa claus dome recipe you’ll need:
For the Base:
- 1 store-bought pound cake or sponge cake
- ¼ cup cherry juice or syrup for soaking
For the Strawberry Layer:
- 2 cups fresh strawberries, hulled and sliced
- ¼ cup granulated sugar
- 1 tablespoon lemon juice
- 1 tablespoon gelatin powder
- 3 tablespoons cold water
For the Mousse:
- 2 cups heavy whipping cream
- 8 ounces cream cheese, softened
- ½ cup powdered sugar
- 1 teaspoon vanilla extract
For Decoration:
- 1 cup whipped cream
- Red fondant or modeling chocolate
- Black edible marker or fondant
- White chocolate shavings
- Fresh strawberries
Timing
This santa claus dome recipe requires:
- Preparation time: 45 minutes
- Chilling time: 4-6 hours
- Decorating time: 30 minutes
- Total time: 5 hours 15 minutes to 7 hours 15 minutes
Step-by-Step Instructions
Step 1: Prepare the Mold
Line a 6-cup dome-shaped bowl or hemisphere mold with plastic wrap, ensuring complete coverage with some overhang. Press the plastic wrap smoothly against all surfaces to eliminate wrinkles that would mar your final presentation. The plastic wrap allows easy unmolding later and creates the perfect smooth surface essential for your santa claus dome recipe.
Step 2: Create the Strawberry Gelatin Layer
Combine sliced strawberries, granulated sugar, and lemon juice in a saucepan over medium heat. Cook for 5-7 minutes until strawberries soften and release their juices. Meanwhile, bloom gelatin by sprinkling it over cold water and letting it sit for 5 minutes. Remove strawberry mixture from heat, stir in bloomed gelatin until completely dissolved, and let cool to room temperature. Pour a thin layer into the bottom of your prepared mold and refrigerate for 20 minutes until set.
Step 3: Prepare the Cream Cheese Mousse
Beat softened cream cheese with powdered sugar and vanilla extract until smooth and fluffy, about 2-3 minutes. In a separate bowl, whip heavy cream to stiff peaks. Gently fold the whipped cream into the cream cheese mixture in three additions, being careful not to deflate the airiness. The mousse should be light, fluffy, and hold its shape—this forms the white layer that contrasts beautifully with the red strawberry layer.
Step 4: Layer the Dome
Once the strawberry layer has set, spread a thick layer of the cream cheese mousse over it, creating an even coating that reaches about halfway up the mold sides. Cut the pound cake into ½-inch slices and brush with cherry juice. Press cake slices against the mousse layer, trimming pieces to fit snugly and creating a cake shell. Fill the center cavity completely with remaining mousse, smoothing the top flat. Cover with plastic wrap and refrigerate for at least 4 hours or overnight until completely firm.
Step 5: Unmold and Frost
Remove the mold from the refrigerator and carefully invert onto your serving plate. Gently remove the bowl and peel away the plastic wrap—you should have a perfect dome shape. If any imperfections exist, smooth them with an offset spatula. Frost the entire dome with whipped cream, creating a smooth white surface that will become Santa’s face and hat. Work quickly before the dessert warms up.
Step 6: Decorate as Santa
Roll out red fondant and cut a large triangle to drape over the top third of the dome, creating Santa’s hat. Use white chocolate shavings or additional whipped cream to create a fluffy hat trim and pom-pom. Fashion a face from skin-toned fondant or leave white cream exposed. Add details like eyes, nose, and mouth using fondant pieces or an edible marker. Create a beard from piped whipped cream or coconut flakes. Add fresh strawberry slices around the base as garnish.
Nutritional Information
For a serving of this santa claus dome recipe (serves 8-10):
- Calories: 385
- Carbohydrates: 34g
- Sugars: 26g
- Protein: 5g
- Fat: 26g
- Saturated fat: 16g
- Cholesterol: 95mg
- Sodium: 180mg
- Fiber: 1g
- Vitamin C: 18mg
- Calcium: 85mg
Healthier Alternatives for the Recipe
Transform your santa claus dome recipe into a healthier version with these modifications:
- Replace heavy cream with Greek yogurt mixed with light whipped topping for reduced fat and added protein
- Use sugar-free gelatin and sugar substitute in the strawberry layer to reduce overall sugar content
- Substitute angel food cake for pound cake to eliminate fat while maintaining structure
- Choose reduced-fat cream cheese to cut saturated fat by approximately 40%
- Add chia seeds to the strawberry layer for omega-3 fatty acids and fiber boost
- Use coconut whipped cream for dairy-free alternative with tropical notes
- Replace powdered sugar with powdered erythritol or monk fruit for zero-calorie sweetness
- Increase fresh strawberry content and reduce mousse quantity for more fruit and less cream
Serving Suggestions
Elevate your santa claus dome recipe experience with these ideas:
- Present on a decorative cake stand surrounded by fake snow made from shredded coconut
- Slice with a sharp knife dipped in hot water for clean cuts that showcase the beautiful layers
- Serve with raspberry coulis or chocolate sauce drizzled on each plate
- Accompany with fresh mint sprigs and additional strawberries for color contrast
- Create individual mini domes using smaller molds for personal servings at formal dinners
- Present this santa claus dome recipe with sparklers for dramatic table presentation when bringing out at parties
- Pair with champagne or dessert wine for elegant holiday entertaining
- Photograph before cutting as the intact dome makes spectacular social media content
Common Mistakes to Avoid
Master this santa claus dome recipe by avoiding these pitfalls:
- Not chilling long enough: Insufficient setting time causes collapse when unmolding—always allow minimum 4 hours for proper structure
- Skipping plastic wrap: Attempting to unmold without liner results in stuck dessert—always line your mold thoroughly
- Warm ingredients: Room temperature cream won’t whip properly and warm mousse won’t set—keep everything well-chilled
- Overmixing mousse: Aggressive folding deflates whipped cream creating dense rather than airy texture—use gentle folding motions
- Uneven layers: Inconsistent spreading creates lopsided dome—take time to ensure even distribution throughout
- Rushing decoration: Decorating warm dessert causes fondant to melt and cream to slide—ensure dome is cold before decorating
- Using wrong mold size: Too large or small affects proportions—stick to recommended 6-cup capacity for proper dome shape
Storing Tips for the Recipe
Preserve the freshness of your santa claus dome recipe with these strategies:
- Refrigerator storage: Keep covered loosely with plastic wrap or under a cake dome in the refrigerator for up to 3 days
- Pre-assembly timing: Assemble the dome 1-2 days before your event and decorate on serving day for best appearance
- Freezing option: Freeze the unmolded but undecorated dome wrapped tightly for up to 1 month—thaw overnight in refrigerator before decorating
- Component preparation: Make strawberry layer and mousse separately up to 2 days ahead, storing refrigerated until assembly
- Decoration storage: If decorated with fondant, the dome can sit refrigerated overnight, but fresh cream decorations should be added close to serving
- Leftover management: Cover cut surfaces with plastic wrap pressed directly against exposed areas to prevent drying
- Transport tips: Keep chilled until the last moment before transport, and use a sturdy cake carrier with high dome for protection
Conclusion
This santa claus dome recipe combines strawberry gelatin, creamy mousse, and cake into a spectacular holiday centerpiece. The impressive presentation and delicious layers create memorable dessert experiences. With make-ahead convenience and creative decoration options, you’ll craft an unforgettable festive creation.
Ready to create this holiday showstopper? Try this santa claus dome recipe and share your decorated masterpieces in the review section below. Leave a comment on our blog with your creative decoration ideas or flavor variations. Check out our other impressive holiday dessert recipes for more celebration inspiration!
FAQs
Can I make the santa claus dome recipe without a dome mold? Yes, use a regular mixing bowl lined with plastic wrap. Any round bowl works, though a true hemisphere shape creates the most realistic dome proportions.
What if my strawberry layer won’t set properly? This usually indicates insufficient gelatin or adding it to mixture that’s too hot. Ensure proper blooming and that strawberry mixture cools to lukewarm before adding gelatin.
Can I use frozen strawberries for this santa claus dome recipe? Absolutely! Thaw frozen strawberries first and drain excess liquid before cooking. The flavor remains excellent though the texture may be slightly softer than fresh.
How do I prevent the dome from collapsing when unmolding? Ensure adequate chilling time of at least 4 hours, use proper gelatin ratios, and unmold onto a cold serving plate. Gentle handling prevents structural damage.
How far in advance can I prepare the santa claus dome recipe? Make the complete dome up to 2 days ahead and refrigerate. Add fresh whipped cream decorations on serving day for optimal appearance and texture.
Your Feedback Matters
There are no reviews yet. Be the first one to write one.