Chocolate Puff Pastry Christmas Tree for Easy Holidays
What if creating an impressive holiday dessert required just three ingredients and twenty minutes of hands-on work? The chocolate puff pastry Christmas tree proves that stunning visual appeal and rich flavor don’t demand complex techniques or professional pastry skills. This baked dessert originated from French pâtisseries where chefs discovered that store-bought puff pastry could be transformed into show-stopping centerpieces through simple twisting and shaping techniques. The chocolate puff pastry Christmas tree combines flaky, buttery layers with melted chocolate hazelnut spread, creating a pull-apart treat that’s become a viral sensation across social media platforms.
Table of Contents
Ingredients List
For this chocolate puff pastry Christmas tree you’ll need:
- 2 sheets frozen puff pastry, thawed
- ¾ cup chocolate hazelnut spread
- 1 egg, beaten
- 2 tablespoons powdered sugar for dusting
- Optional: ½ cup mini chocolate chips
- Optional: 1 teaspoon cinnamon for spiced variation
- Optional: pearl sugar or coarse sugar for sparkle
- Optional: melted white chocolate for drizzle
Timing
This chocolate puff pastry Christmas tree requires:
- Preparation time: 20 minutes
- Baking time: 20-25 minutes
- Cooling time: 10 minutes
- Total time: 50-55 minutes
Step-by-Step Instructions
Step 1: Prepare Your Workspace
Preheat your oven to 375°F and line a large baking sheet with parchment paper. Lightly flour a clean work surface to prevent the puff pastry from sticking. Remove both puff pastry sheets from the freezer and allow them to thaw at room temperature for about 30-40 minutes until pliable but still cold—working with properly thawed pastry ensures even rolling and prevents tearing.
Step 2: Roll and Shape the Base
Unfold both puff pastry sheets on your floured surface. Using a rolling pin, gently roll each sheet to smooth out fold lines and create uniform rectangles approximately 10×12 inches. Place one pastry sheet on the prepared baking sheet. This will serve as the base layer of your chocolate puff pastry Christmas tree, so ensure it’s centered and flat.
Step 3: Add the Chocolate Filling
Spread the chocolate hazelnut spread evenly over the pastry on the baking sheet, leaving a ½-inch border around all edges. Use an offset spatula or the back of a spoon for smooth, consistent coverage. If using mini chocolate chips or cinnamon, sprinkle them over the spread now. The filling provides the rich, gooey center that makes each pull-apart piece irresistible.
Step 4: Create the Tree Template
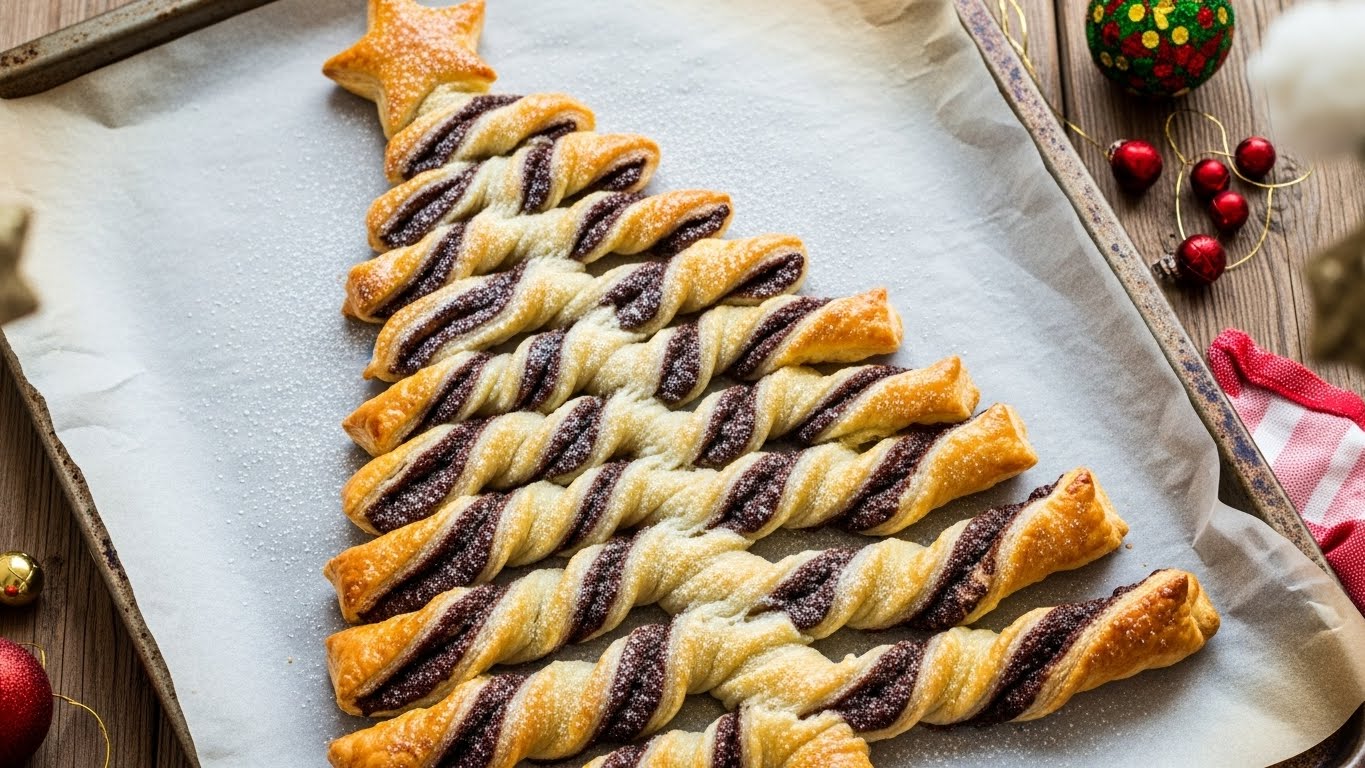
Place the second puff pastry sheet directly on top of the chocolate-covered base, pressing gently around the edges to seal. Using a sharp knife or pizza cutter, cut a triangle shape to form the tree outline, with the point at the top and the widest part at the bottom. Cut a small rectangle at the bottom center for the trunk. Remove excess pastry and save for another use.
Step 5: Make the Twisted Branches
Starting from the bottom of the tree, use a sharp knife to cut horizontal strips about 1 inch apart on both sides of an imaginary center line, leaving the middle 2 inches uncut. You should have pairs of strips that mirror each other. Take each pair of strips and twist them together 2-3 times, creating the branch effect. Continue this process all the way up the tree, leaving the top point and trunk untwisted.
Step 6: Apply Egg Wash and Bake
Brush the entire surface of your chocolate puff pastry Christmas tree with beaten egg, ensuring even coverage for golden browning. Sprinkle with pearl sugar if desired. Transfer to the preheated oven and bake for 20-25 minutes until the pastry is deeply golden, puffed, and crispy. The chocolate filling will bubble slightly—this is perfect. Allow to cool on the baking sheet for 10 minutes before dusting with powdered sugar and serving.
Nutritional Information
For a serving of this chocolate puff pastry Christmas tree:
- Calories: 245
- Carbohydrates: 25g
- Sugars: 10g
- Protein: 3g
- Fat: 15g
- Saturated fat: 5g
- Cholesterol: 15mg
- Sodium: 140mg
- Fiber: 1g
- Iron: 1mg
Healthier Alternatives for the Recipe
Transform your chocolate puff pastry Christmas tree into a healthier version with these modifications:
- Replace chocolate hazelnut spread with almond butter mixed with unsweetened cocoa powder and a touch of maple syrup for reduced sugar
- Use whole wheat puff pastry for added fiber and nutrients, though the texture will be slightly denser
- Substitute the egg wash with plant-based milk for a vegan-friendly option that still provides browning
- Spread Greek yogurt mixed with cocoa powder and stevia between layers for protein-rich filling with fewer calories
- Add sliced bananas or strawberries to the chocolate layer for natural sweetness and added nutrients
- Use dark chocolate with high cocoa content instead of hazelnut spread to reduce sugar while increasing antioxidants
- Make homemade puff pastry with whole grain flour and less butter for better control over ingredients
- Dust with unsweetened cocoa powder instead of powdered sugar to eliminate refined sugar
Serving Suggestions
Elevate your chocolate puff pastry Christmas tree experience with these ideas:
- Serve warm from the oven when the chocolate filling is still gooey and the pastry is at its crispiest
- Present on a large wooden board dusted with powdered sugar to resemble snow for festive table presentation
- Accompany with small bowls of raspberry sauce, caramel, or extra melted chocolate for dipping
- Pair with hot chocolate, mulled wine, or coffee for a complete holiday dessert experience
- Drizzle with melted white chocolate in zigzag patterns to mimic garland or tinsel decorations
- Add a yellow star cut from extra puff pastry and baked separately to crown the top
- Serve with vanilla ice cream or whipped cream on the side for temperature contrast
- Place on a cake stand as a centerpiece that guests can pull apart throughout the party
Common Mistakes to Avoid
Master this chocolate puff pastry Christmas tree by avoiding these pitfalls:
- Working with warm pastry: Room-temperature or warm puff pastry becomes sticky and loses its ability to create flaky layers—keep it cold until ready to bake
- Overfilling with chocolate: Excessive filling oozes out during baking, creating a mess and soggy pastry—maintain the ½-inch border
- Cutting strips unevenly: Mismatched strip sizes create an asymmetrical tree that doesn’t twist properly—measure and cut carefully for uniform branches
- Skipping the egg wash: Without egg wash, the pastry browns unevenly and lacks that professional golden sheen—don’t skip this crucial step
- Overbaking: Burnt edges and dried chocolate result from excessive oven time—watch closely and remove when deeply golden, not dark brown
- Twisting too tightly: Aggressive twisting tears the delicate pastry—gentle 2-3 twists per pair creates beautiful branches without damage
- Serving too soon: Cutting immediately after baking causes the chocolate to run everywhere—patience during cooling ensures clean, pretty slices
Storing Tips for the Recipe
Preserve the freshness of your chocolate puff pastry Christmas tree with these strategies:
- Room temperature storage: Cover loosely with foil and store at room temperature for up to 8 hours if serving the same day—this maintains crispness
- Refrigerator storage: Wrap tightly and refrigerate for up to 3 days, though the pastry loses some crispness—reheat in a 350°F oven for 5-7 minutes to restore texture
- Freezing unbaked: Assemble the entire tree, freeze on the baking sheet until solid, then wrap tightly—bake directly from frozen, adding 5-10 minutes to baking time
- Reheating guidelines: Always reheat in the oven rather than microwave to restore flaky texture—microwave makes pastry soggy and tough
- Make-ahead strategy: Prepare and shape the tree up to 4 hours ahead, cover with plastic wrap, and refrigerate until ready to brush with egg and bake
- Protecting crispness: Store in an airtight container only after completely cooled to prevent condensation that makes pastry soggy
Conclusion
This chocolate puff pastry Christmas tree transforms simple ingredients into an impressive holiday centerpiece. The combination of flaky pastry, rich chocolate filling, and dramatic presentation makes it perfect for gatherings. With minimal effort and maximum visual impact, you’ll create a memorable dessert everyone loves.
Ready to wow your guests? Try this chocolate puff pastry Christmas tree recipe and share your creations in the review section below. Leave a comment on our blog with your favorite filling variations or decoration ideas. Check out our other festive pastry recipes for more holiday baking inspiration!
FAQs
Can I make this chocolate puff pastry Christmas tree with different fillings? Absolutely! Try Nutella alternatives, cookie butter, jam, pesto with cheese, or savory options like spinach and feta. The technique works with virtually any spreadable filling.
How do I prevent the chocolate from leaking out during baking? Maintain a ½-inch border when spreading filling, seal edges well by pressing firmly, and avoid overfilling. Properly sealed edges contain the chocolate as it melts.
Can I prepare the chocolate puff pastry Christmas tree ahead of time? Yes, assemble completely and refrigerate up to 4 hours before baking, or freeze assembled and unbaked for up to 1 month. Bake directly from frozen with slightly longer cooking time.
What if my puff pastry tears while working with it? Overlap torn pieces and press gently to seal, or patch with small pieces of pastry. Once baked and twisted, minor tears won’t be noticeable in the final presentation.
Why didn’t my puff pastry puff up properly? Common causes include working with warm pastry, over-handling the dough, or oven temperature too low. Ensure pastry stays cold and oven is fully preheated to 375°F.
Can I make this chocolate puff pastry Christmas tree vegan? Yes, use vegan puff pastry, dairy-free chocolate spread, and brush with plant milk instead of egg wash. The result will be nearly identical to the traditional version.
How many people does one chocolate puff pastry Christmas tree serve? One tree typically serves 8-12 people as a dessert or 15-20 as part of a dessert spread, depending on how generously you portion the pull-apart pieces.
Your Feedback Matters
There are no reviews yet. Be the first one to write one.