
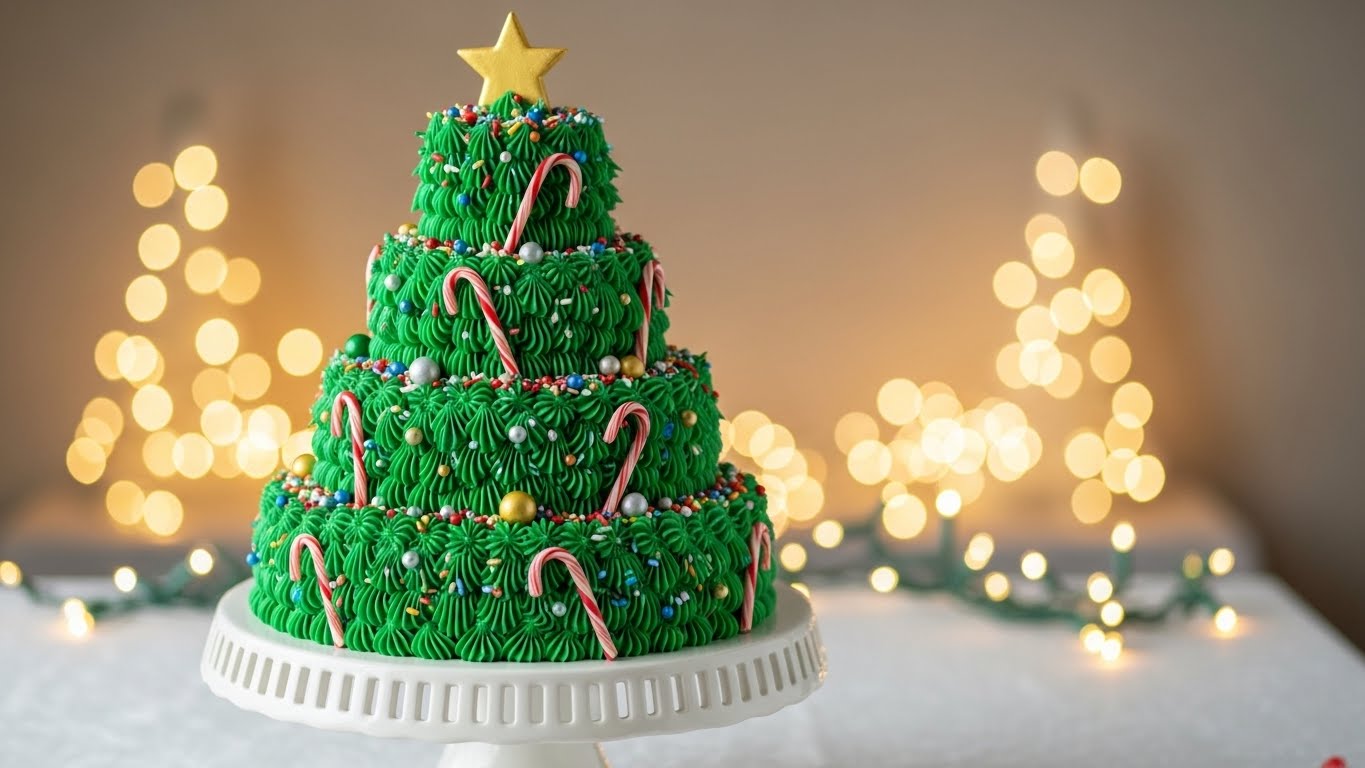
Christmas Tree Cake for a Sweet Holiday Centerpiece
What if the most memorable part of your holiday gathering wasn’t the gifts under the tree, but rather the edible tree standing proudly on your dessert table? The Christmas tree cake transforms a simple baked dessert into an architectural marvel that captures the magic of the season in every slice. This festive creation emerged from European baking traditions where stacked cakes symbolized celebration and abundance, evolving into the show-stopping centerpiece we know today. The Christmas tree cake combines layers of moist vanilla or chocolate cake with buttercream frosting, shaped and decorated to resemble an evergreen adorned with edible ornaments.
Table of Contents
Ingredients List
For this Christmas tree cake you’ll need:
For the Cake:
- 3 cups all-purpose flour
- 2 cups granulated sugar
- 1 cup unsalted butter, softened
- 4 large eggs
- 1 cup whole milk
- 1 tablespoon baking powder
- 1 teaspoon vanilla extract
- ½ teaspoon salt
For the Buttercream Frosting:
- 2 cups unsalted butter, softened
- 8 cups powdered sugar
- ¼ cup heavy cream
- 2 teaspoons vanilla extract
- Green gel food coloring
- Pinch of salt
For Decoration:
- Assorted sprinkles and edible pearls
- Mini candy canes
- Fondant stars or sugar stars
- Edible glitter or sanding sugar
- Small candy decorations
Timing
This Christmas tree cake requires:
- Preparation time: 45 minutes
- Baking time: 25-30 minutes
- Cooling time: 1 hour
- Assembly and decorating time: 1 hour 30 minutes
- Total time: 3 hours 45 minutes
Step-by-Step Instructions
Step 1: Prepare Your Cake Layers
Preheat your oven to 350°F and grease three round cake pans in graduating sizes: 10-inch, 8-inch, and 6-inch. In a large bowl, cream together softened butter and sugar until light and fluffy, about 4 minutes. Add eggs one at a time, beating well after each addition. In a separate bowl, whisk together flour, baking powder, and salt. Alternate adding the dry ingredients and milk to the butter mixture, beginning and ending with dry ingredients. Stir in vanilla extract until just combined.
Step 2: Bake the Layers
Divide the batter among your three prepared pans, using more batter for larger pans and less for smaller ones to ensure even layer heights. Bake for 25-30 minutes, checking smaller pans earlier as they’ll finish first. The cakes are done when a toothpick inserted in the center comes out clean. Allow cakes to cool in pans for 10 minutes, then turn out onto wire racks to cool completely before assembling your Christmas tree cake.
Step 3: Prepare the Green Buttercream
Beat softened butter in a large bowl until creamy and pale, about 3 minutes. Gradually add powdered sugar one cup at a time, beating on low speed to prevent a sugar cloud. Once incorporated, add heavy cream, vanilla extract, and salt, then beat on high speed for 3-4 minutes until light and fluffy. Add green gel food coloring gradually, mixing until you achieve a vibrant evergreen shade. Remember that gel coloring is concentrated, so start with a small amount.
Step 4: Level and Stack the Layers
Use a serrated knife or cake leveler to trim the domed tops off each cooled cake layer, creating flat, even surfaces. Place the largest layer on your serving plate or cake board. Spread a generous layer of green buttercream on top, leaving a small border around the edges. Carefully center the medium layer on top, pressing gently to secure. Add another layer of frosting, then top with the smallest layer. This creates the tiered structure essential to your Christmas tree cake design.
Step 5: Create the Tree Shape
Apply a thin crumb coat of green buttercream over the entire stacked cake, sealing in any loose crumbs. Refrigerate for 20 minutes to set. Once firm, apply a thicker layer of frosting, using an offset spatula to create a smooth or textured surface resembling tree bark or snow-dusted branches. For a more defined tree shape, angle the frosting outward slightly at each tier’s base, mimicking the natural taper of evergreen branches.
Step 6: Decorate Your Tree
Transfer remaining green buttercream to a piping bag fitted with a star tip. Pipe small rosettes, swirls, or dollops all over the cake’s surface to create the appearance of pine needles or branches. While the frosting is still soft, press candy decorations, sprinkles, and edible pearls into the frosting to resemble ornaments. Add mini candy canes as festive accents. Crown your Christmas tree cake with a fondant or sugar star at the peak. Dust with edible glitter or sanding sugar for a magical, snow-kissed finish.
Nutritional Information
For a serving of this Christmas tree cake:
- Calories: 520
- Carbohydrates: 68g
- Sugars: 54g
- Protein: 4g
- Fat: 27g
- Saturated fat: 17g
- Cholesterol: 105mg
- Sodium: 180mg
- Fiber: 1g
- Calcium: 45mg
Healthier Alternatives for the Recipe
Transform your Christmas tree cake into a healthier version with these modifications:
- Replace half the all-purpose flour with whole wheat pastry flour for added fiber without compromising texture
- Substitute applesauce for half the butter in the cake batter to reduce fat while maintaining moisture
- Use coconut sugar or monk fruit sweetener blend in place of granulated sugar to lower the glycemic impact
- Create a cream cheese frosting base instead of pure buttercream to add protein and reduce overall sugar content
- Incorporate Greek yogurt into the batter for added protein and tender crumb
- Use natural food coloring derived from spirulina or matcha powder instead of artificial gel coloring
Serving Suggestions
Elevate your Christmas tree cake experience with these ideas:
- Serve slices on festive holiday plates with a dusting of powdered sugar resembling fresh snowfall
- Accompany each slice with a scoop of peppermint or vanilla ice cream for temperature and flavor contrast
- Drizzle white chocolate ganache over individual slices to mimic icicles hanging from tree branches
- Present with hot cocoa, mulled wine, or spiced cider for a complete holiday dessert experience
- Add fresh raspberries or strawberries beside each slice for a pop of color and tartness
- Create a dessert tableau by surrounding the cake with meringue cookies shaped like snowflakes
Common Mistakes to Avoid
Master this Christmas tree cake by avoiding these pitfalls:
- Overbaking the layers: Dry cake crumbles during assembly and doesn’t provide the moist texture needed—check doneness early and remove when just done
- Frosting warm cake: Applying buttercream to warm layers causes melting and sliding, resulting in a lopsided tree—patience during cooling prevents disaster
- Skipping the crumb coat: Without this initial thin layer, loose crumbs mix into your final frosting, creating an unprofessional, messy appearance
- Using liquid food coloring: Liquid coloring adds moisture that can make frosting runny and produces pale, washed-out green—gel or powder coloring delivers vibrant hues
- Uneven layer heights: Disproportionate tiers create an awkward tree shape—measure batter carefully or trim after baking for visual balance
Storing Tips for the Recipe
Preserve the freshness of your Christmas tree cake with these strategies:
- Room temperature storage: If consuming within 24 hours, keep the assembled cake under a cake dome at room temperature away from direct sunlight or heat
- Refrigerator storage: Store covered in the refrigerator for up to 5 days, bringing to room temperature 30 minutes before serving for best flavor and texture
- Freezing unfrosted layers: Wrap cooled, unfrosted cake layers individually in plastic wrap, then aluminum foil, and freeze for up to 3 months—thaw overnight before assembling
- Protecting decorations: Place toothpicks around the cake’s perimeter before covering with plastic wrap to prevent decorations from smudging or sticking
- Make-ahead strategy: Bake layers 1-2 days in advance and store wrapped at room temperature, then frost and decorate the day of serving for optimal freshness
Conclusion
This Christmas tree cake brings holiday magic to life through layers of tender cake, creamy buttercream, and festive decorations. The impressive vertical presentation creates a memorable centerpiece while delivering delicious flavor in every slice. With careful assembly and creative decoration, you’ll craft an edible masterpiece that captures the season’s joy.
Ready to create your holiday showstopper? Try this Christmas tree cake recipe and share your decorated creations in the review section below. Leave a comment on our blog with your favorite decoration ideas or color variations.
FAQs
Can I make this Christmas tree cake with different cake flavors? Absolutely! Chocolate, red velvet, spice cake, or even lemon cake work beautifully. Just maintain the same batter quantities for proper layer sizes and adjust food coloring accordingly.
How far in advance can I assemble my Christmas tree cake? You can fully assemble and decorate the cake up to 2 days before serving. Store it covered in the refrigerator and bring to room temperature 30-60 minutes before presentation.
How do I transport a Christmas tree cake safely? Place on a sturdy cake board, refrigerate until firm, then carefully box or cover. Transport in a cool vehicle, keeping the base flat and secured. Bring to room temperature before serving.
What’s the best way to cut this Christmas tree cake? Use a long, sharp knife warmed in hot water and wiped dry between cuts. Slice from the outside of each tier working inward, removing decorations as you go.
Can I make this Christmas tree cake gluten-free? Certainly! Substitute with a gluten-free all-purpose flour blend that includes xanthan gum. The texture may be slightly denser but will still taste delicious and hold its shape well.
Your Feedback Matters
There are no reviews yet. Be the first one to write one.


One Comment
Comments are closed.