
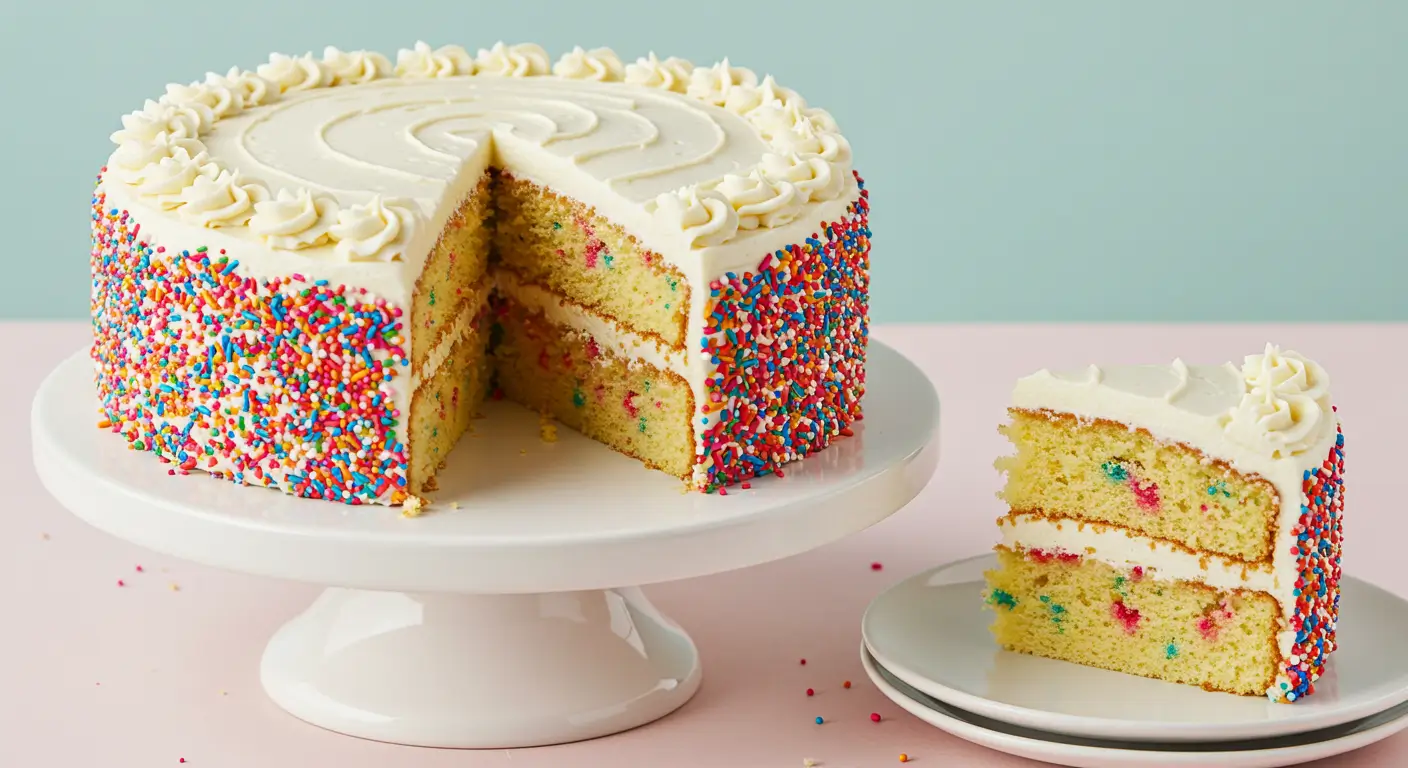
Funfetti Cake Recipe: The Best Ever From Scratch
Ever wondered why homemade funfetti cake outperforms store-bought mixes in blind taste tests across culinary schools nationwide? The secret lies in the quality of ingredients and the technique that brings those iconic colorful sprinkles to life in a tender, vanilla-scented crumb. This funfetti cake recipe transforms a childhood favorite into a sophisticated dessert that maintains its whimsical charm while delivering professional bakery-quality results. Whether you’re planning a birthday celebration or simply craving a slice of nostalgia, this from-scratch funfetti cake will elevate your baking repertoire.
Table of Contents
Ingredients List
For this funfetti cake you’ll need:
- 3 cups all-purpose flour, sifted
- 2½ teaspoons baking powder
- ½ teaspoon baking soda
- 1 teaspoon salt
- 1 cup unsalted butter, softened (substitute with equal parts coconut oil for dairy-free option)
- 1¾ cups granulated sugar
- 4 large eggs, room temperature
- 2 tablespoons pure vanilla extract (the real stuff makes a difference!)
- 1¼ cups buttermilk, room temperature (substitute with almond milk + 1 tablespoon vinegar)
- ⅔ cup rainbow jimmies sprinkles (avoid nonpareils as they bleed color)
For the vanilla buttercream frosting:
- 1½ cups unsalted butter, softened
- 5 cups powdered sugar, sifted
- 3 tablespoons heavy cream (coconut cream works as a substitute)
- 2 teaspoons pure vanilla extract
- ¼ teaspoon salt
- ⅓ cup rainbow sprinkles, plus extra for decoration
Timing
This funfetti cake requires:
- Preparation time: 25 minutes
- Baking time: 30-35 minutes
- Cooling time: 1 hour
- Frosting time: 20 minutes
- Total time: Approximately 2 hours 20 minutes
Step 1: Prepare Your Workspace and Ingredients
Begin your funfetti cake journey by preheating your oven to 350°F (175°C). Grease and line two 9-inch round cake pans with parchment paper. This double protection ensures your cake releases perfectly without sticking. Measure all ingredients ahead of time—professional bakers call this “mise en place”—which transforms your baking experience from chaotic to seamless.
Step 2: Mix the Dry Ingredients
In a medium bowl, whisk together the sifted flour, baking powder, baking soda, and salt. This uniform distribution of leavening agents ensures your funfetti cake rises evenly. The sifting step might seem fussy, but it eliminates lumps and incorporates air, contributing to that coveted light texture that makes homemade cakes superior.
Step 3: Cream Butter and Sugar
In a large mixing bowl, beat the softened butter and sugar together on medium-high speed for 4-5 minutes until pale and fluffy. This extended creaming process incorporates air pockets that expand during baking, creating the foundation for your cake’s tender crumb. Don’t rush this crucial step—proper creaming is where the magic begins for your funfetti cake.
Step 4: Add Eggs and Vanilla
Add eggs one at a time, beating well after each addition. This gradual incorporation prevents the batter from curdling. Then mix in the vanilla extract. The generous amount of vanilla in this funfetti cake recipe creates that signature birthday cake flavor that triggers nostalgic memories with every bite.
Step 5: Alternate Wet and Dry Ingredients
Beginning and ending with the dry ingredients, alternate adding the flour mixture and buttermilk to the butter mixture. Mix on low speed just until combined after each addition. This method prevents overmixing and yields a tender funfetti cake texture. The slight acidity in buttermilk activates the leavening agents while adding subtle complexity to the flavor profile.
Step 6: Fold in Sprinkles
Gently fold in the rainbow jimmies using a spatula, not the mixer. This delicate incorporation prevents the colors from bleeding while ensuring even distribution throughout your funfetti cake batter. For maximum visual impact, use quality jimmies that maintain their shape and color during baking.
Step 7: Bake the Cake Layers
Divide the batter evenly between the prepared pans. Smooth the tops with an offset spatula for even baking. Bake in the preheated oven for 30-35 minutes, or until a toothpick inserted in the center comes out with a few moist crumbs. Your kitchen will fill with the intoxicating aroma of vanilla as your funfetti cake transforms in the oven.
Step 8: Cool Completely
Allow the funfetti cake layers to cool in the pans for 10 minutes before transferring to wire racks to cool completely. Patience here prevents a structural collapse and ensures your frosting won’t melt when applied. Use this cooling time to prepare your frosting and clean up your workspace.
Step 9: Prepare the Buttercream Frosting
Beat the softened butter for the frosting until creamy. Gradually add the sifted powdered sugar, alternating with heavy cream. Add the vanilla extract and salt, then beat on high speed for 3-4 minutes until light and fluffy. The extended beating time incorporates air for a silky, cloud-like texture that perfectly complements your funfetti cake.
Step 10: Assemble and Decorate
Place one funfetti cake layer on a serving plate. Spread a generous layer of buttercream on top. Position the second layer and cover the entire cake with remaining frosting. Gently press additional sprinkles onto the sides and top for that classic funfetti cake aesthetic. For a professional touch, chill the frosted cake for 15 minutes before the final decoration.
Nutritional Information
For a serving of this funfetti cake (1/12 of the recipe):
- Calories: 680
- Total Fat: 34g
- Saturated Fat: 21g
- Cholesterol: 145mg
- Sodium: 310mg
- Total Carbohydrates: 89g
- Dietary Fiber: 1g
- Sugars: 65g
- Protein: 6g
- Calcium: 8% DV
- Iron: 10% DV
Healthier Alternatives for the Recipe
Transform your funfetti cake into a healthier version with these modifications:
- Whole Wheat Pastry Flour – Replace half the all-purpose flour with whole wheat pastry flour for added fiber while maintaining a tender texture
- Reduced Sugar – Decrease sugar to 1¼ cups without compromising the cake’s structure
- Greek Yogurt Substitution – Replace half the butter with equal parts Greek yogurt for reduced fat and added protein
- Natural Food Coloring – Use naturally colored sprinkles made with vegetable dyes instead of artificial colors
- Almond Extract – Substitute ¼ teaspoon of the vanilla with almond extract to enhance flavor without adding calories
- Applesauce Option – Replace ¼ cup of butter with unsweetened applesauce for moisture with fewer calories
Serving Suggestions
Elevate your funfetti cake experience with these ideas:
- Serve slices with a side of fresh berries for a bright, tart contrast to the sweet cake
- Pair with homemade vanilla bean ice cream for an elevated birthday celebration
- Create a dessert trifle using cubed funfetti cake, layered with whipped cream and fresh fruit
- Transform into cake pops by crumbling leftovers and mixing with a bit of frosting
- Serve alongside a cappuccino or latte for an indulgent coffee shop experience at home
- Add a drizzle of white chocolate ganache for an elegant finishing touch
Common Mistakes to Avoid
Master this funfetti cake by avoiding these pitfalls:
- Overmixing the Batter – Stop mixing as soon as ingredients are incorporated to prevent a dense, tough cake
- Using Cold Ingredients – Ensure butter, eggs, and milk are at room temperature for proper emulsification
- Wrong Sprinkle Type – Avoid nonpareils or sugar pearls which bleed color or sink to the bottom
- Opening the Oven Door – Resist checking too early as temperature fluctuations cause uneven rising
- Frosting Warm Cake – Allow layers to cool completely to prevent melting buttercream
- Measuring Flour Incorrectly – Spoon flour into measuring cups rather than scooping directly from the container
Storing Tips for the Recipe
Preserve the freshness of your funfetti cake with these strategies:
- Room Temperature Storage – Keep unfrosted layers tightly wrapped in plastic for up to 2 days
- Refrigeration Method – Store frosted cake in an airtight container in the refrigerator for up to 5 days
- Freezer Technique – Wrap unfrosted layers in plastic wrap and foil for up to 3 months
- Frosting Preservation – Store extra buttercream in an airtight container in the refrigerator for up to 1 week
- Thawing Process – Allow frozen cake to thaw overnight in the refrigerator for best texture results
- Freshness Extension – Add a slice of bread to your storage container to maintain moisture
Conclusion
This funfetti cake recipe transforms simple ingredients into a spectacular celebration centerpiece with its tender crumb, vibrant sprinkles, and rich vanilla flavor. The detailed techniques ensure foolproof results that surpass any boxed mix while creating lasting memories. Try this recipe for your next special occasion, share your results in the review section, or leave a comment on our blog!
FAQs
Why did my sprinkles bleed into the batter? This typically happens when using nonpareils (the tiny round sprinkles) instead of jimmies (the longer rod-shaped sprinkles). Jimmies are more color-stable during baking and are recommended for funfetti cake.
Is there a dairy-free version of this funfetti cake? Yes, substitute the butter with equal parts vegetable shortening or coconut oil, and replace buttermilk with almond milk mixed with 1 tablespoon of vinegar. For the frosting, use vegetable shortening and non-dairy milk.
Can I use cake flour instead of all-purpose flour? Yes! For an even softer texture, substitute the all-purpose flour with cake flour. Use 3⅓ cups of cake flour instead of 3 cups all-purpose for this funfetti cake recipe.
How can I ensure my cake layers bake evenly? Use cake strips soaked in water around your pans, or make your own by wrapping wet kitchen towels in foil. This insulates the sides of the pan, allowing the cake to rise more evenly without doming.
Your Feedback Matters
There are no reviews yet. Be the first one to write one.


One Comment
Comments are closed.