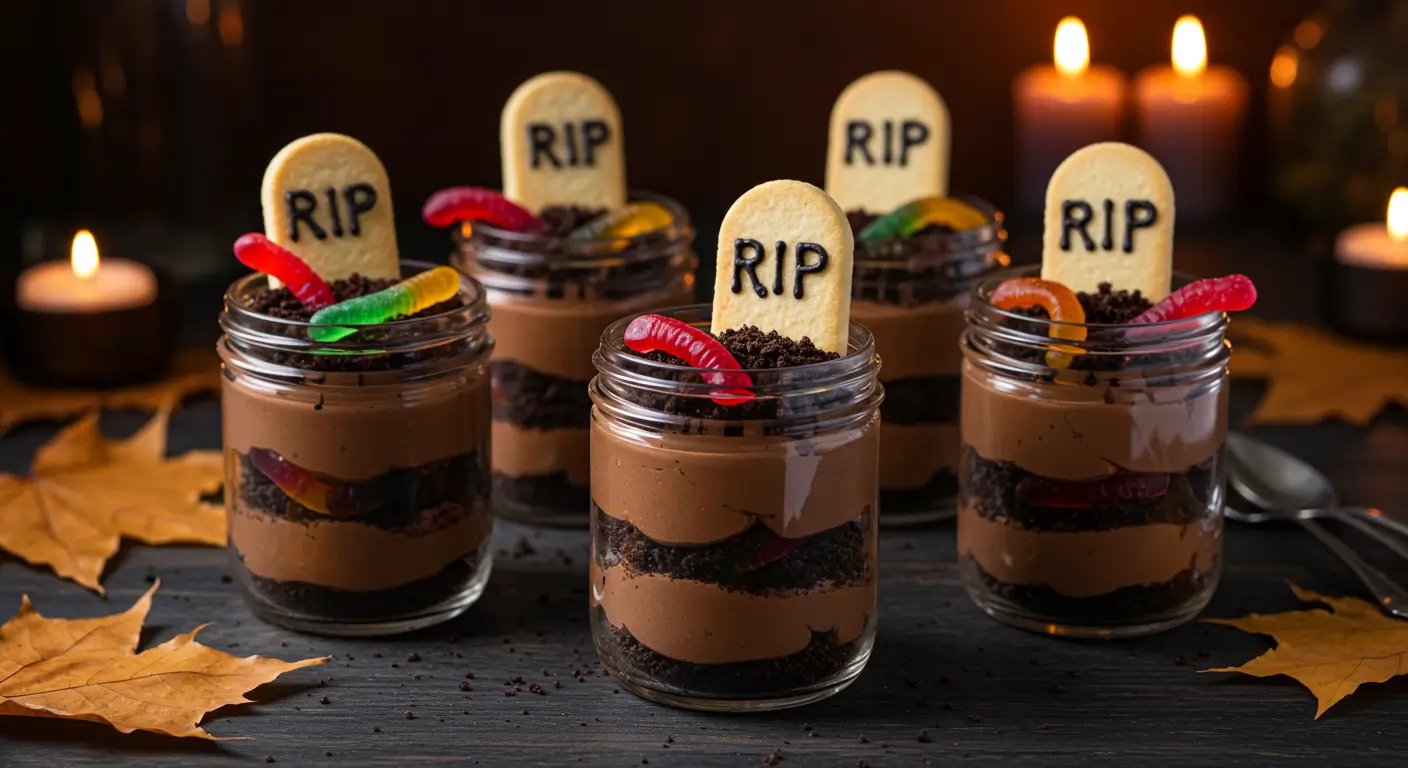
Graveyard Dirt Cups: Easy Halloween Dessert in 15 Minutes
What transforms an ordinary chocolate dessert into a spine-tingling Halloween centerpiece that guests will remember long after the last trick-or-treater has gone home? The answer lies in the artful combination of rich chocolate pudding, crushed cookies, and creative graveyard-themed decorations that make Graveyard Dirt Cups the ultimate crowd-pleasing treat. This delightfully spooky dessert combines the nostalgic appeal of childhood favorites with sophisticated presentation techniques that work equally well for family gatherings and adult Halloween parties.
The versatility of Graveyard Dirt Cups extends beyond their visual appeal, offering endless customization opportunities to match your specific Halloween vision while accommodating various dietary preferences and taste requirements.
Table of Contents
Ingredients List
For this Graveyard Dirt Cups recipe, you’ll need a carefully curated selection of ingredients that work together to create the perfect illusion of a haunted cemetery while delivering exceptional taste and texture.
For the Chocolate Pudding Base:
- 2 packages (3.9 oz each) instant chocolate pudding mix
- 4 cups cold whole milk
- 1 cup heavy whipping cream
- 3 tablespoons powdered sugar
For the Dirt Layer:
- 20 chocolate sandwich cookies (Oreos work perfectly, or use gluten-free alternatives)
- 2 tablespoons cocoa powder for extra richness
For Graveyard Decorations:
- 8-10 rectangular vanilla wafer cookies or graham crackers for tombstones
- 1 tube black decorating gel or melted dark chocolate
- 8-10 gummy worms (look for realistic-looking varieties)
- Fresh mint leaves or plastic cemetery decorations (optional)
- Edible moss made from green coconut flakes (optional but impressive)
Timing
This Graveyard Dirt Cups recipe requires minimal time investment with maximum visual impact:
- Preparation time: 10 minutes for pudding mixing and cookie crushing
- Assembly time: 5 minutes for layering and decorating each cup
- Chilling time: 2 hours minimum for optimal consistency and flavor melding
- Decoration time: 10 minutes for creating tombstones and final touches
- Total active time: 15 minutes of hands-on work
- Total time including chilling: 2 hours and 15 minutes
Step-by-Step Instructions
Step 1: Prepare the Chocolate Pudding Foundation
Begin by whisking the instant chocolate pudding mix with cold milk in a large mixing bowl, following package directions for consistency. Beat the mixture vigorously for 2 minutes until it reaches a smooth, thick consistency without any lumps. The key to achieving restaurant-quality pudding lies in using properly chilled milk and allowing the mixture to set for exactly 5 minutes before proceeding to the next step.
Step 2: Create the Whipped Cream Layer
In a separate chilled bowl, whip the heavy cream and powdered sugar using an electric mixer until soft peaks form. Avoid over-whipping, as this can lead to a grainy texture that detracts from the smooth, creamy experience. Gently fold half of the whipped cream into the prepared chocolate pudding, creating a lighter, more luxurious texture that elevates this simple dessert into something truly special.
Step 3: Craft the Perfect Dirt Texture
Place the chocolate sandwich cookies in a food processor and pulse until they reach a varied texture—some fine crumbs mixed with slightly larger pieces that mimic real soil. If you don’t have a food processor, place cookies in a sealed plastic bag and crush them with a rolling pin, leaving some chunky pieces for authenticity. Mix in cocoa powder to deepen the chocolate flavor and enhance the realistic dirt appearance.
Step 4: Create Personalized Tombstones
Using vanilla wafers or graham crackers, create unique tombstones by writing spooky messages with black decorating gel. Popular options include “RIP,” “Here Lies,” or playful Halloween puns. Allow the gel to set for 10 minutes before handling. For added creativity, vary the tombstone sizes and shapes to create a more realistic graveyard aesthetic.
Step 5: Layer Your Graveyard Scene
Start each cup with a generous layer of chocolate pudding mixture, filling about one-third of the container. Add a layer of cookie crumbs, then repeat with another pudding layer and more dirt. Top with a final layer of cookie crumbs, leaving enough space at the rim for decorative elements. This layering technique creates visual depth and ensures every spoonful contains the perfect balance of creamy and crunchy textures.
Step 6: Add Final Graveyard Details
Insert tombstones at varying angles to create a natural, aged cemetery look. Strategically place gummy worms so they appear to be emerging from the soil, with some partially buried for realistic effect. Add any additional decorative elements like mint leaves to represent grass or small plastic cemetery accessories for enhanced theming.
Nutritional Information
For a serving of this Graveyard Dirt Cups recipe, you’ll receive a balanced combination of indulgent treat satisfaction with moderate nutritional content:
- Calories: 285 per serving
- Total Fat: 12g
- Saturated Fat: 8g
- Cholesterol: 35mg
- Sodium: 320mg
- Total Carbohydrates: 42g
- Dietary Fiber: 2g (
- Total Sugars: 35g
- Added Sugars: 28g
- Protein: 6g
- Calcium: 180mg
- Iron: 1.5mg
Healthier Alternatives for the Graveyard Dirt Cups Recipe
Transform your Graveyard Dirt Cups into a healthier version with these modifications that maintain the spooky appeal while boosting nutritional value:
- Sugar-free pudding mix: reduces overall sugar content by approximately 15g per serving while maintaining the rich chocolate flavor
- Greek yogurt replacement: substitute half the pudding with vanilla Greek yogurt to increase protein content and create a tangy flavor contrast
- Coconut whipped cream: use chilled coconut cream whipped with maple syrup for a dairy-free alternative that adds healthy fats
- Homemade cookie crumbs: create dirt using crushed graham crackers mixed with cocoa powder and a touch of honey for less processed ingredients
- Fresh fruit additions: incorporate diced strawberries or raspberries between layers for added vitamins and natural sweetness
- Chia seed boost: mix chia seeds into the pudding for omega-3 fatty acids and additional fiber
- Dark chocolate shavings: replace some cookie crumbs with grated dark chocolate (70% cacao or higher) for antioxidants
Serving Suggestions
Elevate your Graveyard Dirt Cups experience with these creative presentation and pairing ideas that transform a simple dessert into a memorable Halloween event centerpiece:
- Individual mason jar presentation: creates a rustic, authentic graveyard aesthetic while allowing guests to take home their dessert containers as keepsakes
- Dry ice effects: place small pieces of dry ice in a separate container nearby for dramatic fog effects (never put dry ice directly in food)
- Themed serving tray: arrange cups on a black serving board surrounded by fake spider webs, plastic bats, and battery-operated LED candles
- Color-coordinated garnishes: add orange sprinkles or candy corn pieces to tie into traditional Halloween color schemes
- Interactive decoration station: set up a DIY tombstone decorating area where guests can personalize their dessert cups
- Complementary beverage pairings: serve the Graveyard Dirt Cups alongside spiced apple cider, pumpkin spice lattes, or blood-red fruit punch for a complete themed experience
- Miniature graveyard scenes: create elaborate displays using multiple cups arranged to form cemetery layouts with paths and themed accessories
- Adult party variations: incorporate Halloween-themed liqueurs like Kahlua or Bailey’s into the pudding for grown-up gatherings
Common Mistakes to Avoid
Master this Graveyard Dirt Cups recipe by avoiding these common pitfalls that can compromise both appearance and taste quality:
- Over-mixing the pudding: can create a thin, watery consistency that won’t hold its shape when layered—mix only until smooth
- Using warm milk: prevents proper pudding thickening and results in a runny texture that ruins the layered effect
- Crushing cookies too finely: eliminates the realistic dirt texture—aim for varied sizes with some larger chunks remaining
- Adding decorations too early: causes gummy worms and tombstones to sink into the pudding before it sets properly
- Insufficient chilling time: results in loose layers that blend together rather than maintaining distinct visual separation
- Ignoring proportion balance: ensure each cup has equal amounts of pudding and dirt layers for consistent taste and appearance across all servings
Storing Tips for the Graveyard Dirt Cups Recipe
Preserve the freshness of your Graveyard Dirt Cups with these strategic storage approaches that maintain both flavor integrity and visual appeal:
- Refrigeration requirements: store completed cups covered with plastic wrap in the refrigerator for up to 4 days maximum
- Decoration timing: add gummy worms and tombstones just before serving to prevent them from becoming soggy or losing their shape
- Freezer adaptation: pudding base can be frozen for up to 1 month, but texture may become slightly grainy upon thawing
- Transportation tips: use cups with tight-fitting lids when transporting to prevent spills and maintain presentation quality
- Temperature control: keep desserts chilled until 15 minutes before serving for optimal texture and food safety
- Leftover management: individual portions make it easy to store only what’s needed while keeping remaining servings fresh and untouched
Conclusion
Graveyard Dirt Cups represent the perfect fusion of nostalgic comfort food appeal and creative Halloween presentation, delivering professional-quality results through simple techniques accessible to any skill level. This versatile dessert combines rich chocolate flavors with interactive theming elements, creating memorable experiences that satisfy both visual and culinary expectations while requiring minimal time investment for maximum impact.
Ready to create your own spooky dessert masterpiece? Try this Graveyard Dirt Cups recipe for your next Halloween gathering and share your creative decoration ideas in the comments below.
FAQs
Can I substitute the instant pudding with homemade pudding? Absolutely! for this Graveyard Dirt Cups recipe, homemade chocolate pudding will work beautifully, though you’ll need to allow extra cooling time. The texture may be slightly different, but the taste will be even richer and more authentic.
How do I prevent the layers from mixing together? Ensure your pudding is properly set before layering and use a gentle spooning technique when adding each layer. Chilling between layers for 15-20 minutes can also help maintain distinct separation.
Are there gluten-free options for the cookie crumbs? Yes, many brands offer gluten-free chocolate sandwich cookies that work perfectly for this Graveyard Dirt Cups recipe. You can also use gluten-free graham crackers mixed with cocoa powder for a different but equally delicious dirt effect.
How long do the decorated cups stay fresh? When properly stored in the refrigerator, Graveyard Dirt Cups maintain their best quality for 3-4 days. The pudding base stays fresh longer than the decorative elements, so add gummy worms and tombstones closer to serving time.
Your Feedback Matters
There are no reviews yet. Be the first one to write one.