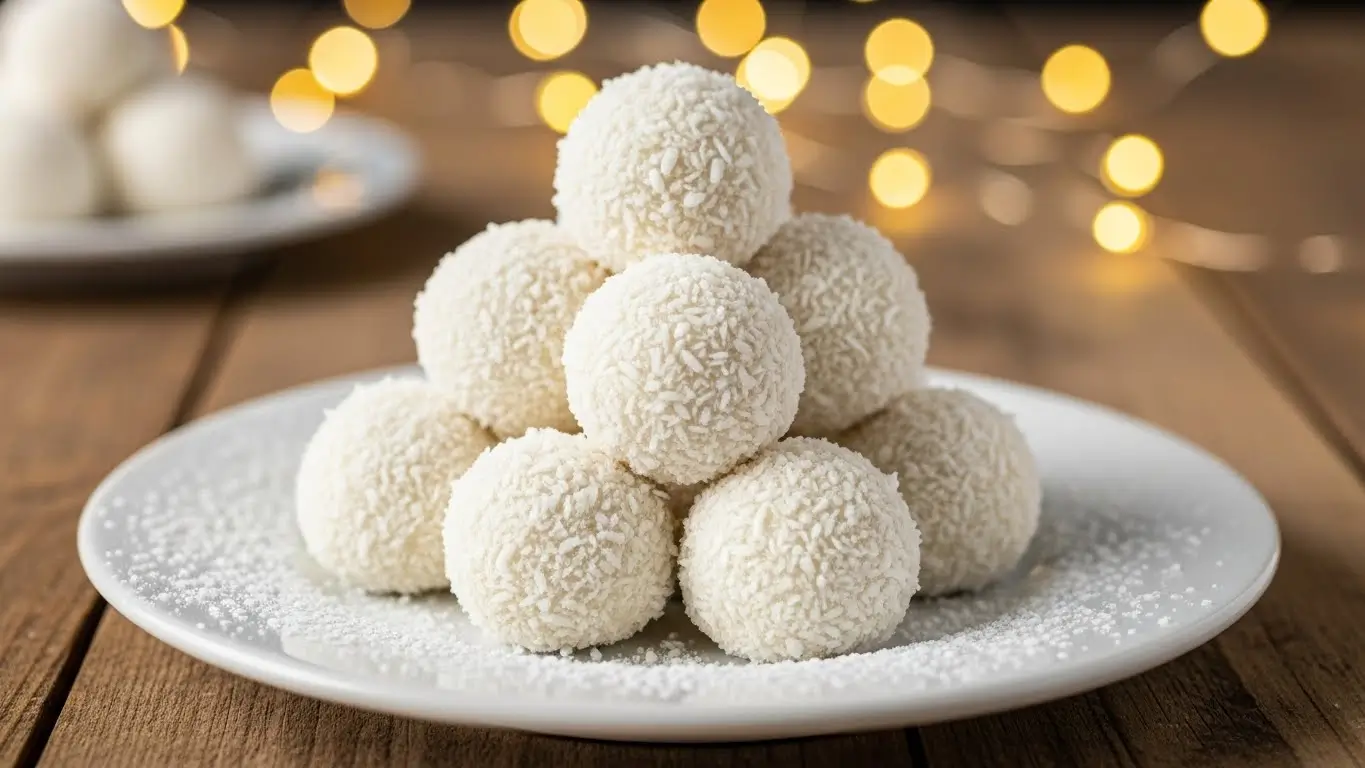
No Bake Snowball Treats: Easy Holiday Dessert
What if creating picture-perfect holiday treats required no oven, no baking skills, and just fifteen minutes of your time? The no bake snowball treats deliver exactly that—a delightful no bake dessert combining crushed cookies, cream cheese, and snowy coconut coating into bite-sized spheres of sweetness. This festive creation emerged from the popularity of cake balls and truffles, adapted specifically for winter celebrations. The no bake snowball treats transform simple pantry ingredients into elegant confections that look like they came from an upscale bakery.
Table of Contents
Ingredients List
For this no bake snowball treats you’ll need:
- 15 ounces vanilla sandwich cookies
- 8 ounces cream cheese, softened
- 12 ounces white chocolate chips or almond bark
- 2 cups sweetened shredded coconut
- 1 teaspoon vanilla extract
- ¼ teaspoon almond extract
- Pinch of salt
- Optional: white sanding sugar for extra sparkle
- Optional: edible silver pearls for decoration
Timing
This no bake snowball treats requires:
- Preparation time: 15 minutes
- Chilling time: 30 minutes
- Coating time: 15 minutes
- Setting time: 20 minutes
- Total time: 1 hour 20 minutes
Step-by-Step Instructions
Step 1: Crush the Cookies
Place vanilla sandwich cookies in a food processor and pulse until they form fine, even crumbs with no large chunks remaining. Alternatively, place cookies in a sealed plastic bag and crush with a rolling pin until uniformly fine. Transfer the cookie crumbs to a large mixing bowl. The finer the crumbs, the smoother your no bake snowball treats will be, so take time to achieve consistent texture.
Step 2: Mix the Base
Add softened cream cheese, vanilla extract, almond extract, and a pinch of salt to the cookie crumbs. Using a hand mixer or sturdy spoon, blend until the mixture comes together into a uniform dough that holds its shape when pressed. The consistency should resemble thick playdough—if too dry, add cream cheese by the tablespoon; if too sticky, add more cookie crumbs. Ensure complete incorporation for smooth, cohesive snowballs.
Step 3: Form the Balls
Using a small cookie scoop or tablespoon, portion the mixture into equal amounts about 1 to 1.5 inches in diameter. Roll each portion between your palms to create smooth, round balls. Place formed balls on a parchment-lined baking sheet, spacing them slightly apart. Refrigerate for 30 minutes until firm—this crucial step prevents the balls from falling apart during coating and ensures your no bake snowball treats maintain their perfect spherical shape.
Step 4: Melt the White Chocolate
While the balls chill, melt white chocolate chips or almond bark in a microwave-safe bowl in 30-second intervals, stirring between each heating. Alternatively, use a double boiler on the stovetop for more controlled melting. Stir until completely smooth and pourable. The chocolate should be warm but not hot—excessive heat causes the coating to slide off rather than adhere properly.
Step 5: Coat with White Chocolate
Remove chilled balls from the refrigerator. Working with one at a time, drop a ball into the melted white chocolate. Use a fork to roll it around until completely coated, then lift it out, allowing excess chocolate to drip back into the bowl. Tap the fork gently on the bowl’s edge to remove more excess. The coating should be thin and even, not thick and gloopy.
Step 6: Roll in Coconut
Immediately after coating with chocolate, while the coating is still wet, roll the ball in shredded coconut until completely covered. The coconut adheres best to wet chocolate, creating that signature snowball appearance. Place finished snowballs back on the parchment-lined sheet. Repeat with remaining balls. Let them sit at room temperature for 20 minutes or refrigerate for 10 minutes to set the chocolate coating completely.
Nutritional Information
For a serving of this no bake snowball treats:
- Calories: 165
- Carbohydrates: 19g
- Sugars: 14g
- Protein: 2g
- Fat: 9g
- Saturated fat: 6g
- Cholesterol: 8mg
- Sodium: 95mg
- Fiber: 1g
- Calcium: 25mg
Healthier Alternatives for the Recipe
Transform your no bake snowball treats into a healthier version with these modifications:
- Replace vanilla sandwich cookies with graham crackers or vanilla wafers for reduced sugar and less processed ingredients
- Use reduced-fat cream cheese or Greek cream cheese to cut saturated fat while maintaining creamy texture
- Substitute dark chocolate for white chocolate to increase antioxidants and reduce sugar content
- Choose unsweetened shredded coconut and add a touch of stevia for controlled sweetness
- Add ground flaxseed or chia seeds to the mixture for omega-3 fatty acids and fiber
- Use coconut cream cheese for dairy-free alternative with tropical flavor
- Replace half the cream cheese with mashed avocado for healthy fats and nutrients
- Roll in crushed almonds or pistachios instead of coconut for protein and different texture
Serving Suggestions
Elevate your no bake snowball treats experience with these ideas:
- Arrange on a tiered dessert stand dusted with powdered sugar for elegant presentation
- Serve in individual cupcake liners on a festive platter for easy grabbing at parties
- Present in clear glass jars tied with ribbon as homemade holiday gifts
- Create a dessert board featuring snowballs alongside other bite-sized treats
- Serve chilled directly from the refrigerator for firmer texture on warm days
- Drizzle with melted dark chocolate in zigzag patterns before the white chocolate sets
- Place in decorative boxes lined with tissue paper for edible party favors
- Arrange around a centerpiece of evergreen branches and candles for winter tablescape
Common Mistakes to Avoid
Master this no bake snowball treats by avoiding these pitfalls:
- Using cold cream cheese: Firm cream cheese creates lumpy mixture that won’t blend smoothly—always bring to room temperature first
- Skipping the chill time: Warm balls fall apart when dipped in chocolate and won’t hold their shape—patience is essential
- Chocolate too hot: Overheated chocolate causes balls to dissolve and creates thin, messy coating—use gentle heat
- Adding coconut after chocolate sets: Coconut won’t stick to hardened chocolate—work quickly while coating is wet
- Uneven ball sizes: Inconsistent portions create unprofessional appearance—use a cookie scoop for uniformity
- Rushing the process: Trying to speed through prevents proper setting and handling—allow adequate time for each step
- Not removing excess chocolate: Thick coating overwhelms the treat and creates heavy, overly sweet result—tap off excess thoroughly
Storing Tips for the Recipe
Preserve the freshness of your no bake snowball treats with these strategies:
- Room temperature storage: Keep in an airtight container at cool room temperature for up to 3 days if your kitchen stays below 70°F
- Refrigerator storage: Store in covered container in the refrigerator for up to 2 weeks—bring to room temperature 15 minutes before serving
- Layer separation: Place parchment or wax paper between layers to prevent sticking when stacking in containers
- Freezing option: Freeze in single layer on baking sheet until solid, then transfer to freezer bags for up to 3 months—thaw in refrigerator overnight
- Make-ahead timing: Prepare up to 1 week before your event and refrigerate, or make 1 month ahead and freeze
- Coating protection: Store away from strong-smelling foods as coconut and white chocolate absorb odors easily
- Gift packaging: Package only fully set snowballs to prevent smudging, and keep refrigerated until gift-giving time
Conclusion
These no bake snowball treats combine cookies, cream cheese, and coconut into delightful bite-sized desserts. The simple preparation and impressive presentation make them perfect for holiday gatherings and gift-giving. With no oven required and endless customization options, you’ll create beautiful treats effortlessly.
Ready to make these festive favorites? Try this no bake snowball treats recipe and share your creations in the review section below. Leave a comment on our blog with your favorite coating variations or flavor combinations. Explore our other easy holiday dessert recipes for more no-bake inspiration!
FAQs
Can I make no bake snowball treats with different cookie flavors? Absolutely! Chocolate sandwich cookies create chocolate snowballs, while ginger snaps make spiced versions. Lemon cookies with white chocolate and coconut create a tropical twist perfect for winter.
Why are my no bake snowball treats falling apart? Common causes include insufficient cream cheese, not mixing thoroughly, or skipping the chilling step. Ensure proper ratios and always refrigerate before coating for structural integrity.
Can I use milk chocolate instead of white chocolate? Yes, though the appearance will be different. Milk or dark chocolate creates a brown base rather than white, but still tastes delicious. The coconut coating provides the snowy look.
How far in advance can I prepare no bake snowball treats? Make them up to 1 week ahead and refrigerate, or up to 3 months ahead and freeze. They’re perfect for holiday prep as they maintain quality over time.
What if I don’t have almond extract? Simply omit it or substitute with additional vanilla extract. The almond extract adds subtle depth but isn’t essential to the recipe’s success.
Can I make no bake snowball treats dairy-free? Yes, use dairy-free cream cheese and ensure your chocolate coating is dairy-free. Many white chocolate alternatives exist for various dietary needs while maintaining appearance and taste.
How do I prevent the coconut from falling off? Roll in coconut immediately while chocolate is wet, pressing gently to help it adhere. Once chocolate sets, the coconut becomes firmly attached and won’t shed easily.
Your Feedback Matters
There are no reviews yet. Be the first one to write one.