
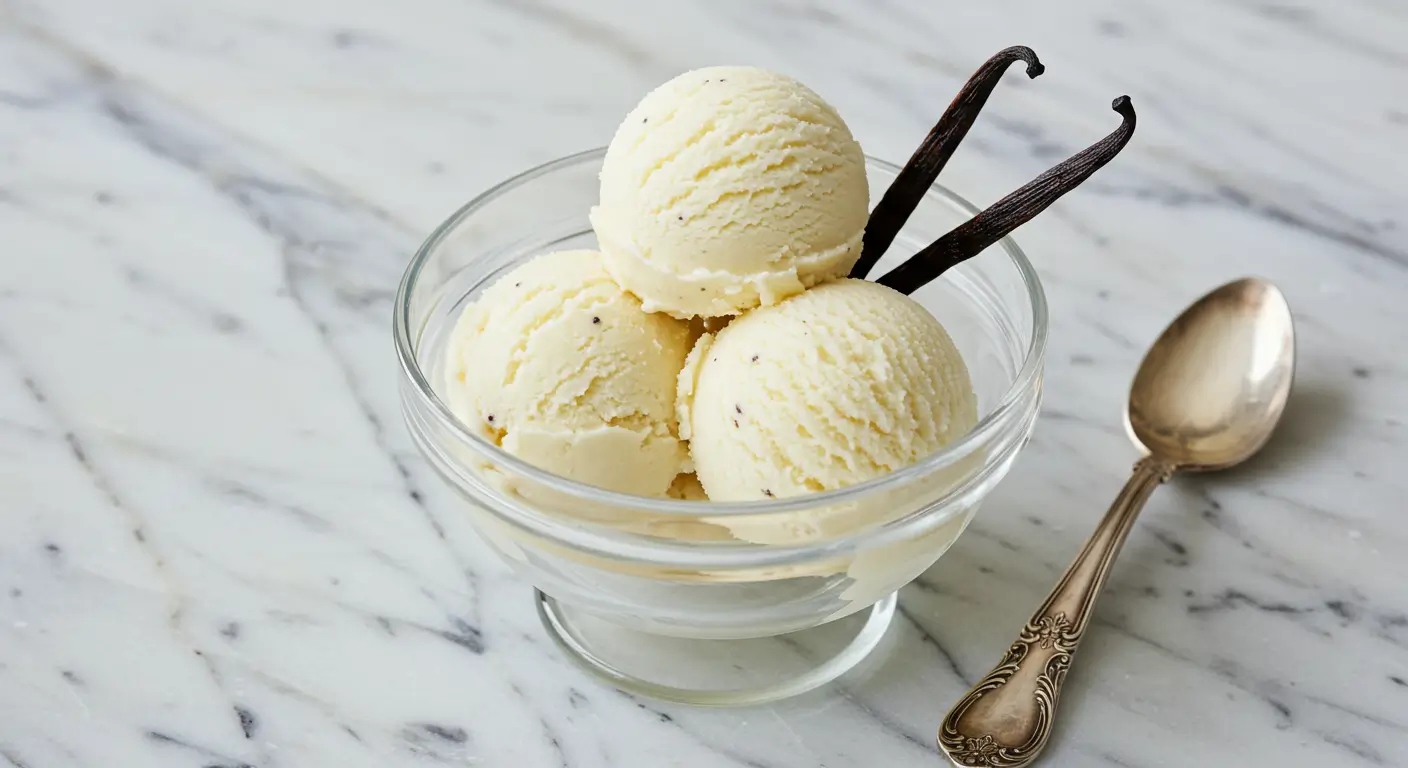
Vanilla Ice Cream Recipe: Step-by-Step Perfection
What makes the difference between bland, artificial-tasting vanilla ice cream and the kind that transforms a simple dessert into an extraordinary culinary experience? While many assume that vanilla is merely a basic flavor, mastering the perfect vanilla ice cream recipe requires understanding the delicate balance between premium vanilla extract, proper custard technique, and ideal churning conditions. This homemade vanilla ice cream recipe delivers the pure, aromatic essence of real vanilla beans combined with a silky smooth texture that melts perfectly on your palate. The secret lies in using high-quality vanilla extract and creating a rich custard base that captures the complex floral notes that make vanilla one of the world’s most beloved frozen recipe flavors.
Table of Contents
Ingredients List
For this vanilla ice cream recipe you’ll need carefully selected ingredients that work harmoniously to create the ultimate creamy, aromatic frozen dessert:
- 2 cups heavy cream
- 1 cup whole milk
- 3/4 cup granulated sugar
- 6 large egg yolks
- 2 tablespoons pure vanilla extract
- 1 vanilla bean pod, scraped
- 1/4 teaspoon sea salt
Timing
This vanilla ice cream recipe requires careful timing for optimal results:
- Preparation & Cooking time: 32 minutes
- Cooling time: 3 hours minimum
- Churning time: 18-22 minutes
- Final freezing time: 4-6 hours
- Total recipe time: 8-9 hours from start to finish
Step-by-Step Instructions
Step 1: Prepare the Vanilla Base
Begin by splitting your vanilla bean pod lengthwise with a sharp knife and scraping out the tiny black seeds using the back of the knife blade. Combine these precious vanilla caviar seeds with your vanilla extract in a small bowl, creating an intensely aromatic mixture that will infuse your entire batch with authentic vanilla flavor.
Step 2: Heat the Dairy Mixture
In a heavy-bottomed saucepan, combine the heavy cream, milk, and half of your sugar (approximately 6 tablespoons). Add the scraped vanilla bean pod to the mixture for additional flavor extraction. Heat over medium heat, stirring occasionally, until small bubbles form around the edges and steam rises from the surface—this indicates the mixture is properly heated without boiling.
Step 3: Prepare the Egg Custard
While your dairy mixture heats, whisk the egg yolks with the remaining sugar in a large bowl until the mixture becomes pale yellow and slightly thickened. This process, known as ribboning, creates the foundation for your silky custard base and ensures proper incorporation with the hot dairy.
Step 4: Temper the Eggs
Remove the vanilla bean pod from the hot dairy mixture and slowly drizzle about one cup of the hot mixture into the egg yolks while whisking vigorously. This tempering technique prevents the eggs from scrambling and creates a smooth, professional-quality custard base that’s essential for premium homemade ice cream.
Step 5: Cook the Custard
Return the tempered mixture to the saucepan and cook over low heat, stirring constantly with a wooden spoon or heat-resistant spatula. Continue cooking until the custard coats the back of your spoon and reaches 170°F on an instant-read thermometer. The mixture should be thick enough that you can draw a clean line through it with your finger.
Step 6: Strain and Cool
Immediately strain the hot custard through a fine-mesh sieve into a clean bowl to remove any lumps and the vanilla bean pod. Stir in your vanilla extract mixture and salt, then cover with plastic wrap pressed directly against the custard surface to prevent skin formation. Refrigerate for at least three hours until completely chilled.
Step 7: Churn to Perfection
Pour the chilled custard into your ice cream maker and churn according to manufacturer instructions, typically 18-22 minutes until it reaches a soft-serve consistency. Transfer the vanilla ice cream to an airtight container and freeze for 4-6 hours until firm enough to scoop properly.
Nutritional Information
For a serving of this vanilla ice cream recipe (approximately 1/2 cup serving, recipe yields 8 servings):
- Calories: 275
- Total Fat: 18g
- Saturated Fat: 11g
- Cholesterol: 135mg
- Sodium: 95mg
- Total Carbohydrates: 24g
- Sugars: 24g
- Protein: 4g
- Calcium: 14% Daily Value
- Vitamin A: 18% Daily Value
- Riboflavin: 12% Daily Value
Healthier Alternatives for the Recipe
Transform your vanilla ice cream recipe into a healthier version with these modifications:
- Greek Yogurt Blend: Replace one cup of heavy cream with thick Greek yogurt for increased protein and probiotics
- Coconut Milk Base: Use full-fat coconut milk instead of dairy for a naturally creamy, dairy-free alternative rich in medium-chain triglycerides
- Natural Sweeteners: Substitute refined sugar with pure honey, maple syrup, or dates for lower glycemic impact and additional minerals
- Avocado Enhancement: Blend in one ripe avocado for extra creaminess and heart-healthy monounsaturated fats
- Protein Powder Addition: Incorporate vanilla protein powder to boost protein content while maintaining the classic flavor profile
- Stevia Sweetening: Use stevia or monk fruit sweetener to significantly reduce calorie content while preserving sweetness
- Cashew Cream Base: Soak and blend raw cashews for a rich, dairy-free foundation packed with beneficial minerals and healthy fats
Serving Suggestions
Elevate your vanilla ice cream recipe experience with these ideas:
- Classic Pairings: Serve alongside warm apple pie, chocolate brownies, or fresh berry cobbler for traditional comfort food combinations
- Gourmet Toppings: Drizzle with high-quality caramel sauce, hot fudge, or fresh fruit compotes for restaurant-quality presentation
- Textural Contrasts: Add crunched cookies, toasted nuts, or granola for interesting texture variations and enhanced flavor complexity
- Seasonal Garnishes: Top with fresh berries in summer, candied nuts in fall, or peppermint bark during winter holidays
- Beverage Floats: Create root beer floats, coffee affogatos, or champagne floats for sophisticated adult treats
- International Twists: Pair with baklava, churros, or mochi for multicultural dessert experiences
- Elegant Presentations: Serve in chilled glass bowls with edible flowers, gold leaf, or artisanal cookie wafers
Common Mistakes to Avoid
Master this vanilla ice cream recipe by avoiding these pitfalls:
- Overheating the Custard: Exceeding 175°F will curdle the eggs and create an irreversibly grainy texture that ruins the smooth mouthfeel
- Insufficient Cooling Time: Churning warm custard results in poor texture development and may damage your ice cream maker’s motor components
- Low-Quality Vanilla: Using artificial vanilla extract or imitation flavoring significantly diminishes the complex flavor profile that defines great vanilla ice cream
- Inadequate Straining: Skipping the straining step can leave egg lumps or vanilla bean particles that create an unpleasant eating experience
- Improper Storage: Storing without proper airtight sealing leads to ice crystal formation and absorption of freezer odors
- Rushing the Custard: Cooking the custard too quickly over high heat prevents proper thickening and can cause separation
- Under-Churning: Insufficient churning time results in dense, icy texture rather than the desired light, creamy consistency
Storing Tips for the Recipe
Preserve the freshness of your vanilla ice cream recipe with these strategies:
- Airtight Containers: Use freezer-safe containers with tight-fitting lids to prevent ice crystal formation and maintain optimal texture
- Surface Protection: Press plastic wrap or parchment paper directly onto the ice cream surface before sealing to minimize air exposure
- Consistent Temperature: Store at 0°F to -5°F in the coldest part of your freezer, avoiding the door where temperatures fluctuate
- Portion Management: Divide into smaller containers for easier serving while maintaining quality of remaining portions
- Container Selection: Choose wide, shallow containers over tall, narrow ones for easier scooping and better temperature consistency
- Freezer Organization: Store away from strong-smelling foods that could affect the delicate vanilla flavor profile
- Quality Timeline: Consume within 1-2 months for peak flavor and texture, though properly stored ice cream remains safe longer
Conclusion
This vanilla ice cream recipe transforms simple ingredients into a luxurious frozen dessert through proper technique and quality components. The rich custard base, authentic vanilla flavor, and silky texture create an indulgent treat that surpasses store-bought alternatives in both taste and satisfaction.
Ready to create this timeless classic? Try this recipe and share your results in the comments below. We’d love to hear about your vanilla ice cream adventures and any creative variations you discover!
FAQs
Can I make this vanilla ice cream recipe without eggs? Yes, you can create an eggless version by using 2 tablespoons of cornstarch mixed with a small amount of milk as a thickening agent, though the texture will be slightly less rich than the traditional custard base.
Why does my homemade vanilla ice cream taste icy instead of creamy? Icy texture typically results from insufficient fat content, over-churning, or temperature fluctuations during storage; ensure you’re using heavy cream and maintaining consistent freezer temperatures.
What’s the difference between using vanilla extract versus vanilla beans? Vanilla beans provide more intense flavor and visual appeal with specks throughout the ice cream, while extract offers convenience and consistent flavor distribution throughout the base.
How do I fix vanilla ice cream that won’t firm up in the freezer? This usually indicates insufficient churning time or improper custard consistency; ensure the custard properly coats a spoon before churning and churn until the mixture reaches soft-serve consistency.
Your Feedback Matters
There are no reviews yet. Be the first one to write one.

One Comment
Comments are closed.